Workaround: PnP Sites Core not provisioning Sub Web Security!

Introduction

Let’s start by reminding ourselves how SharePoint groups work: when you add a SP group to a sub web, it is actually added to the Site Collection SharePoint groups. And when you assign some permissions (e.g. ‘Contribute’) to that group in the sub web, two things may happen, depending on whether the sub web inherits parent permissions or not:

  • permissions are inherited – the group is given ‘Contribute’ permissions in the Site Collection and all sub webs receive it too, implicitly.
  • permissions inheritance is broken – the group is given ‘Contribute’ permissions only on the Sub Web! In the Site Collection root you will still see the group under ‘People & Groups’ page (because as we said, the groups are provisioned on Site Collection level), but you will not see in the ‘Permissions’ page, because it is given permissions only in the sub web.

The issue

Ok, now consider the following scenario: you are provisioning a PnP Template against a sub web. e.g.:

<pnp:Provisioning xmlns:pnp="http://schemas.dev.office.com/PnP/2015/12/ProvisioningSchema">
  <pnp:Preferences Generator="OfficeDevPnP.Core, Version=2.3.1604.0, Culture=neutral, PublicKeyToken=3751622786b357c2" />
  <pnp:Templates ID="CONTAINER-TEMPLATE-XXX">
    <pnp:ProvisioningTemplate ID="TEMPLATE-XXX" Version="1">
      <pnp:Security>
        <pnp:SiteGroups>
          <pnp:SiteGroup Title="My Group" Owner="SHAREPOINT\system" AllowMembersEditMembership="false" AllowRequestToJoinLeave="false" AutoAcceptRequestToJoinLeave="false" OnlyAllowMembersViewMembership="true" />
        </pnp:SiteGroups>
        <pnp:Permissions>
          <pnp:RoleAssignments>
            <pnp:RoleAssignment Principal="My Group" RoleDefinition="Full Control" />
          </pnp:RoleAssignments>
        </pnp:Permissions>
      </pnp:Security>
    </pnp:ProvisioningTemplate>
  </pnp:Templates>
</pnp:Provisioning>

what would you expect to happen when the PnP engine runs this? Personally, I would expect that the engine sees the ‘My Group’, creates it under the Site Collection and assigns ‘Full Control’ permission level to it on the Sub Web level. Now, as we explained, if the Sub Web permission inheritance is not broken, that would actually mean giving the ‘My Group’ ‘Full Control’ rights within the entire site collection. But this is the exact reason why the PnP provisioning engine ignores the Security element for sub webs! Because the PnP team has a principle of ‘provisioning a site can never change settings in other sites‘. Yes, PnP provisioning engine will simply ignore your Security instructions, when executed against a sub web.

However, in the case when the sub web has broken permission inheritance, I disagree! When the inheritance is broken, the Group will be created on the Site Collection level, but it will only be given rights on the sub web, hence – not actually changing anything in the other (parent) site!

Solution

To overcome this issue, I have created a PnP extension, which will perform the Security element provisioning on the sub web exactly the way I think it should be – if the web is a sub web and the permission inheritance is broken – go ahead with the Security provisioning, instead of ignoring it.

Template

First you have to change your template to:

<pnp:Provisioning xmlns:pnp="http://schemas.dev.office.com/PnP/2015/12/ProvisioningSchema">
  <pnp:Preferences Generator="OfficeDevPnP.Core, Version=2.3.1604.0, Culture=neutral, PublicKeyToken=3751622786b357c2" />
  <pnp:Templates ID="CONTAINER-TEMPLATE-XXX">
    <pnp:ProvisioningTemplate ID="TEMPLATE-XXX" Version="1">
      <pnp:Security>
        <pnp:SiteGroups>
          <pnp:SiteGroup Title="My Group" Owner="SHAREPOINT\system" AllowMembersEditMembership="false" AllowRequestToJoinLeave="false" AutoAcceptRequestToJoinLeave="false" OnlyAllowMembersViewMembership="true" />
        </pnp:SiteGroups>
        <pnp:Permissions>
          <pnp:RoleAssignments>
            <pnp:RoleAssignment Principal="My Group" RoleDefinition="Full Control" />
          </pnp:RoleAssignments>
        </pnp:Permissions>
      </pnp:Security>
      <pnp:Providers>
        <pnp:Provider Enabled="true" HandlerType="My.Assembly.NameSpace.MyClassName, My.Assembly" />
      </pnp:Providers>
    </pnp:ProvisioningTemplate>
  </pnp:Templates>
</pnp:Provisioning>

Which basically tells the PnP engine to search for the My.Assembly.dll and within it, it shall find My.Assembly.NameSpace.MyClassName class, which implements IProvisioningExtensibilityHandler interface. Search Google for more information on PnP extension engine.

Extension

Here is the C# code for your extension class, which is basically the original PnP method, but with modifications to provision Security against a sub web, when the sub web has broken inheritance.

Conclusion & Download

With this extension in place, you can now provision Security elements against a sub web, when the sub web has broken inheritance. It overrides the default PnP provisioning engine, which ignores the Security element, as soon as it sees that it’s a sub web.

Again, my opinion is that sub web Security should not be ignored, when the sub web has broken inheritance, because it doesn’t change in any way any other site, except adding the Group container on the Site Collection level (but without giving it any permissions!).

You can find the code samples as a here.

Cheers!

SharePoint 2013 People & Groups field as a dropdown with predefined choices

If you are in the SharePoint consulting business, by no doubt you have already heard the following customer requirement:

We need a SharePoint field, which allows the user to pick one of the few predefined groups we have defined there

That’s not possible out of the box, although possible with some custom development. There is many different options here, but the one I recommend and I find it to be a ‘best practice’, is the Field JSLink approach.

Below I will show you how to implement a JSLink, which changes the People & Groups field from this:

1

to this:

2

Ok, first thing first, you probably already have somewhere in your project the definition of the Field. Something like:


You need to add JSLink attribute to it. So:

JSLink="~site/SiteAssets/jquery-1.11.3.min.js|~site/SiteAssets/JSLink/MyCompany.JSLink.Fields.GroupsAsDropdownTest.js" />

You will find the full source code of the JSLink at the bottom of the post, but let’s quickly go over it.

First, we have the standard

SPClientTemplates.TemplateManager.RegisterTemplateOverrides(FieldCtx);

which tells SharePoint to use our custom JavaScript functions to render the field in the different display modes (Edit, New, etc).

Let’s review the function which renders the field in New/Edit mode, as it is the most interesting one. What it basically does is, render the field as SharePoint would render it OOB:

var html = jQuery(SPClientPeoplePickerCSRTemplate(ctx));
html.hide();
 
return html.outerHTML() + dropdownHTML;

but hide it, and next to it render our custom dropdown list, which is driven by the configuration specified in

Fields_Renderer.DropdownOptions

Important note: the groups listed in this structure should be valid ones!

Whenever the value in the custom dropdown list changes, we run the following function:

Fields_Renderer.SelectionChange

which uses the standard SharePoint people picker functionality to clear the current value in the hidden OOB people field and set a new one (defined as value attribute in the dropdown option).

In summary:

We use JSLink on the People & Groups field to hide the standard field control and render a custom dropdown next to it. Whenever the dropdown changes, it updates the value in the hidden OOB field. When the user presses ‘Save’ on the form, SharePoint persists the user field as it normally would.

Here is the source code:

https://github.com/hyankov/PeopleAndGroupsAsDropdown

Happy coding!

How to override the NewDocSet.aspx redirect

If you are opening the NewDocSet.aspx page in a dialog, similarly to this:

options.url = L_Menu_BaseUrl + "/_layouts/15/NewDocSet.aspx?List=" + {listGuid} + "&ContentTypeId=" + {CT} + "&RootFolder=" + L_Menu_BaseUrl + "/Lists/YourList";
options.title = "New Document Set";
options.autoSize = true; 
// Show dialog
SP.SOD.execute('sp.ui.dialog.js', 'SP.UI.ModalDialog.showModalDialog', options);

you may have noticed that after creation of the docset, the dialog redirects your page to the welcome page of the newly created doc set. If you are opening this dialog from some kind of a dashboard, this is usually an undesired behavior.

I have taken a look at the NewDocSet.aspx backend with ILSpy and I have determined that when the new Document Set is provisioned, the code end with a calls to this function – ‘window.frameElement.navigateParent’. Turns out this is a function defined by SharePoint, when you open a dialog. It basically redirects the parent window to a new URL. And NewDocSet.aspx uses this function to redirect the window to the Welcome page of the new doc set.

So, to override this behavior, we simply override the dialog’s window frame function (make sure you execute this AFTER the dialog is opened):

// Override the redirect behavior of NewDocSet.aspx
for (var i = 0; i < frames.length; i++) {
    // Find the frame of the dialog
    var frmWindow = frames[i];
    if (frames[i].location.href.indexOf(‘/_layouts/15/NewDocSet.aspx’) > -1) {
        // Override the function
        var prxy = frmWindow.frameElement.navigateParent;
        frmWindow.frameElement.navigateParent = function () {
            // Disregard the original function’s URL, refresh the page we are currently on
            prxy.apply(this, [window.location.href]);
        };
    }
}

The patter is called proxy pattern, by the way.  This code will refresh the page that opened the NewDocSet.aspx dialog, instead of redirecting to the doc set’s welcome page.

Good luck (with SharePoint, you need it).

SharePoint 2013 Refiner Multi-Value (‘Contains’ instead of an ‘Equals’)

You are in a situation where your Managed Property contains multiple values (e.g. you programmatically populate a Property Bag, which is added to the IndexedPropertyKeys and then exposed as a Managed Property). You add a Content Search Web Part on your page and also a refiner. In the Refiner panel you add your managed property and you are horrified by the following end result:

1

If you are reading this page you already know that such rendering causes a problem – the entries within the multi-value field are not ‘normalized’ to single entries, hence, you now can’t search only for items that have a property which contains only (e.g.) one of the values. You have already probably tried setting the ‘multi-value’ property of the Managed Property, but alas, no success.

Fear not, for I have a solution! It is delivered as a custom Refiner filter, which is based on the Filter_MultiValue.html OOB Refiner filter. Here it is: click here.

How to use it? Simple:

1. Drop the file into your Filters folder (Site Collection -> Settings -> Master pages and page layouts -> Display Templates -> Filters)

2. Make sure you Save, Check In and Publish the file

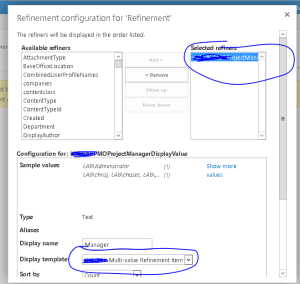
3. Go to your refiner and edit the web part properties -> Choose refiners

4. Select the newly added Filter

2

5. Ok -> Save page

And the result now is:

3

Much better! Selecting a refiner value and applying actually works too 🙂

4

For the curious, how does the custom Filter work? Well:

1. We set the var useContains = true; Although in my experience it has no effect on the end result

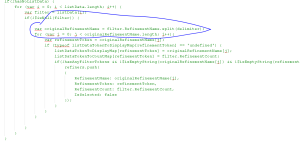
2. More importantly, we add one more for(;;) cycle in the code, which splits every filter item into separate filters:

5

So, instead of having:

[ ] Value 1, Value 2, Value 3, …

you will have:

[ ] Value 1

[ ] Value 2

[ ] Value 3

3. But MOST IMPORTANTLY, instead of hex-ing the refiner token, as the OOB filter does, we use the plain-text value:

6

This is crucial! Without this part the refiner will not work as expected.

So let’s compare an original query URL generated by the OOB Filter_MultiValue.html with the custom Filter_Contains_MultiValue.html.

Before:

#Default=
{
“k”:””,
“r”:[{
“n”:”HahnAirPMOProjectManagerDisplayValue”,
“t”:[“\”ǂǂ4c41425c41646d696e6973747261746f72\””],
“o”:”OR”,
“k”:false,
“m”:{“\”ǂǂ4c41425c41646d696e6973747261746f72\””:”LAB\\Administrator”}}]}

After:

Default=
{
“k”:””,
“r”:[{
“n”:”HahnAirPMOProjectManagerDisplayValue”,
“t”:[“LAB\\Administrator”],
“o”:”OR”,
“k”:false,
“m”:{“LAB\\Administrator”:”LAB\\Administrator“}
}]
}

That specific part seems to cause SharePoint to do ‘contains’ search, instead of an ‘equals’ search.

Hope this helps!

PS

Don’t forget to set your ‘delimiter’ variable to whatever string you use for separating the values within the field. It is currently set to ‘, ‘ (coma and space).

Update 1:

I have updated the source code to handle strings with backslash in them differently. i.e.:

– If the string has a backslash (e.g. ‘domain\admin’) – don’t put it withing brackets

– if the string has no backslash (e.g. ‘Farm Admin’) – put it in brackets, otherwise the KQL is invalid and causes an error

Fixing ‘The SPListItem being updated was not retrieved with all taxonomy fields’ or how to provision taxonomy fields correctly

If someone wants to provision a taxonomy field in a declarative way, the following pattern should be followed:

      <Field Type="Note" DisplayName="Strategy_0" StaticName="Strategy_0" Name="Strategy_0" ID="{the GUID of your hidden NOTE field here}" ShowInViewForms="FALSE" Required="FALSE" Hidden="TRUE" />
      <Field Type="TaxonomyFieldType" DisplayName="Strategy" ShowField="Term1033" Required="FALSE" EnforceUniqueValues="FALSE" ID="{6f1ce2c9-9c40-407f-a0b9-7785220a14ff}" StaticName="Strategy" Name="Strategy">
        <Customization>
          <ArrayOfProperty>
            <Property>
              <Name>TermSetId</Name>
              <Value xmlns:q2="http://www.w3.org/2001/XMLSchema" p4:type="q2:string" xmlns:p4="http://www.w3.org/2001/XMLSchema-instance">{the GUID of your termset here}</Value>
            </Property>
            <Property>
              <Name>AnchorId</Name>
              <Value xmlns:q3="http://www.w3.org/2001/XMLSchema" p4:type="q3:string" xmlns:p4="http://www.w3.org/2001/XMLSchema-instance">00000000-0000-0000-0000-000000000000</Value>
            </Property>
            <Property>
              <Name>TargetTemplate</Name>
              <Value xmlns:q6="http://www.w3.org/2001/XMLSchema" p4:type="q6:string" xmlns:p4="http://www.w3.org/2001/XMLSchema-instance"></Value>
            </Property>
            <Property>
              <Name>TextField</Name>
              <Value xmlns:q6="http://www.w3.org/2001/XMLSchema" p4:type="q6:string" xmlns:p4="http://www.w3.org/2001/XMLSchema-instance">{the GUID of your hidden NOTE field here}</Value>
            </Property>
            <Property>
              <Name>IsPathRendered</Name>
              <Value xmlns:q7="http://www.w3.org/2001/XMLSchema" p4:type="q7:boolean" xmlns:p4="http://www.w3.org/2001/XMLSchema-instance">false</Value>
            </Property>
          </ArrayOfProperty>
        </Customization>
      </Field>

That would be sufficient, if it were not for the SspId property (the GUID of your keyword term store). Unfortunately there is no token for this and SharePoint is not smart enough to use the default one, if you leave it empty! You will get an error ‘The SPListItem being updated was not retrieved with all taxonomy fields‘. So, a little code work-around is needed.

You have to create a feature receiver or something else, which should run the following code against your field:

        public override void FeatureActivated(SPFeatureReceiverProperties properties)
        {
            var web = properties.Feature.Parent as SPWeb;

            // Strategy
            var strategyField = web.Lists["YourList"].Fields["YourTaxonomyField"] as TaxonomyField;
            TaxonomyHelper.ConnectTaxonomyField(web.Site, strategyField);
        }
        /// <summary>
        /// Fix up a taxonomy field
        /// </summary>
        /// <param name="site"></param>
        /// <param name="field"></param>
        public static void ConnectTaxonomyField(SPSite site, TaxonomyField field)
        {
            //Create a Taxonomy Session
            TaxonomySession session = new TaxonomySession(site);
            if (session.DefaultKeywordsTermStore != null)
            {
                field.SspId = session.DefaultKeywordsTermStore.Id;
                field.Update();
            }
            else
            {
                throw new Exception(string.Format("DefaultKeyWordTermStore not found in this site {0}", site.Url));
            }
        }

Again, if SharePoint used the default keyword store if you leave out the SspId empty or if there was a token for it, that would not be necessary.

Still, I am happy with the approach, as it is 95% declarative and I need the code only to link my field to the keyword store. The TermsetId is part of my declaration, and not the code, so, goal achieved!

SharePoint document library list view webpart drag and drop

The following article assumes that you know how to add programmatically list view web parts on your page.

You might find yourself being in a situation in which you are programmatically adding a List View Webpart pointing to a document library on your site and you wonder why:

  • ‘add document’ link does not show
  • drag & drop does not show up or does not work

Basically, you have ended up with something along the lines of:

drag drop not working

First, and foremost, you have to change your code and instead of adding ListViewWebPart, you have to add XsltListViewWebPart (source).

var webPartToAdd = new XsltListViewWebPart
                        {
                            ChromeState = PartChromeState.Normal,
                            ChromeType = PartChromeType.None,
                            Title = "Documents List View",
                            ListName = web.Lists["Documents"].ID.ToString("B").ToUpper(),
                            XmlDefinition = web.Lists["Documents"].DefaultView.GetViewXml()
                        }

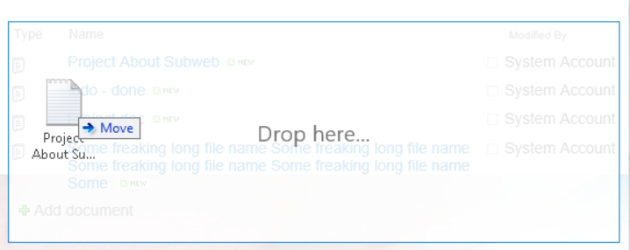
This will get you to the point where you see the drag&drop functionality (in IE only, I don’t see it in Firefox):

drop here

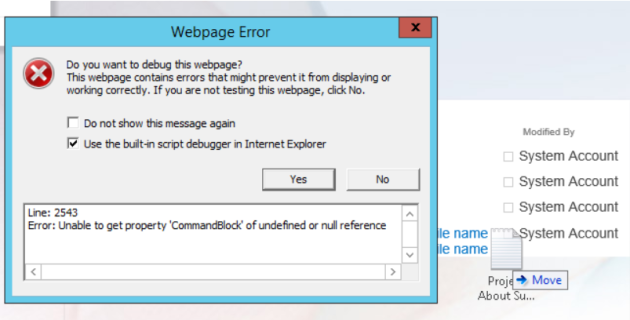
However, when you drop the file, you might get the error:

exception

The reason for this error is the fact that sp.js and sp.core.js are not registered on the page (SP.Utilities and SP.Utilities.CommandBlock are undefined)! I think this is a bug in SharePoint, because if you simply click Edit on the page and then save it (without changing anything), the web part will start working (because the scripts will now be registered on the page).

So, how do we overcome this issue? Well, I have determined that if we execute the following script on the page, the drag&drop in the web part will work fine:

SP.SOD.executeFunc('sp.js', 'SP.Utilities.Utility', function() { console.log('sp.js loaded'); });
SP.SOD.executeFunc('sp.core.js', 'SP.Utilities.CommandBlock', function() { console.log('sp.core.js loaded'); });

This code will include the scripts that SharePoint ‘forgets’ to include. You have variety of options how to register those scripts on the page. I have decided to include them as a content of a Content Editor WebPart which I provision on the same page where I provision the (xslt) list view web part:

// add script registration work-around (there is a bug in the framework, which does not register those scripts until we edit the page).
var xmlDoc = new XmlDocument();
var xmlElement = xmlDoc.CreateElement(“HtmlContent”);
xmlElement.InnerText = “<script type=’text/javascript’>SP.SOD.executeFunc(‘sp.js’, ‘SP.Utilities.Utility’, function() { console.log(‘sp.js loaded’); }); SP.SOD.executeFunc(‘sp.core.js’, ‘SP.Utilities.CommandBlock’, function() { console.log(‘sp.core.js loaded’); })</script>”;
var cewp = new ContentEditorWebPart
{
ChromeState = PartChromeState.Normal,
ChromeType = PartChromeType.None,
Title = “Drag and drop script registration workaround”,
Content = xmlElement
};

And then, viola!, the drag&drop works:

viola


I hope this helps,

Hristo

When using [TaxonomyField].SetFieldValue you get ‘set AllowUnsafeUpdates to true’ exception

In some situations (such as ajax requests and other non-postback methodologies), you might encounter the following error:

Updates are currently disallowed on GET requests.  To allow updates on a GET, set the ‘AllowUnsafeUpdates’ property on SPWeb

This might happen if you are trying to set a Term type of object in an SPList item’s field. e.g.:

SPListItem myItem = … ;

Term myTerm = … ;

var taxonomyField = myItem[“MyTaxonomyField”] as TaxonomyField;

taxonomyField.SetFieldValue(item, term);

myItem.Update();

If you execute this in the backend during an ajax request (or maybe some other use cases too) this will fail with the exception mentioned above.

If you are reading this article it means that  you have already set the SPWeb’s AllowUnsafeUpdates to true and the problem still persists. For some reason this is the default SharePoint behavior and it doesn’t matter how many times you set the AllowUnsafeUpdates to true, it will still be ignored. So, we need another solution.

You might be tempted to use a solution (1, 2) such as setting a TaxonomyFieldValue to the field, instead of Term directly. Such as:

string termString = String.Concat(thisYear.GetDefaultLabel(1033), TaxonomyField.TaxonomyGuidLabelDelimiter, thisYear.Id);

TaxonomyFieldValue tagValue = new TaxonomyFieldValue(string.Empty);
tagValue.PopulateFromLabelGuidPair(termString);
oField.SetFieldValue(i, tagValue);


That would be a mistake because such approach breaks the Search Crawl (i.e. the crawler won’t crawl your field properly). So what is the correct solution? As crazy as it might sound, it is to set the HttpContext.Current to null just prior to setting the term field and then restoring it back.

So, solution:

var httpContext = HttpContext.Current;

HttpContext.Current = null;

SPListItem myItem = … ;

Term myTerm = … ;

var taxonomyField = myItem[“MyTaxonomyField”] as TaxonomyField;

taxonomyField.SetFieldValue(item, term);

myItem.Update();

HttpContext.Current = httpContext;


What does this achieve? It lies to SharePoint that you don’t have a HttpContext (i.e. you are not triggering this code from the browser), so it won’t validate your context and won’t throw an exception about AllowUnsafeUpdates.


Best Regards,

Hristo


How to implement HTML5 Canvas undo function

HTML 5 is awesome. My most favorite feature is the canvas. It has many uses and of them is to allow the users of your website to draw free shapes.

If that’s what your website utilizes the canvas element for, by no doubt you have already identified the need for an ‘undo’ function. Perhaps you have already tried the .save() and .restore() functions, only to realize that they only save and restore the fill style of the drawing shapes.

This is exactly the problem I had, while creating my online Rage Comic Editor. Fortunately, I implemented a solution, which I would like to share with you.

The following tutorial assumes that you are familiar with the canvas element and its usage. It will only explain the technique I have discovered to save and restore a canvas drawing state. The implementation is (naturally) in JavaScript.

First, and most important, I have an online demo illustrating the tutorial, here. If you are inpatient or want to get straight to the code, feel free to navigate there and ‘view source’. It is well commented and should be self-explanatory.

In the demo I didn’t bother to implement a ‘free hand drawing’ tool. Instead, I have two buttons only – one of them draw lines on the canvas and the other button undoes one step at a time.

Now to the point… The whole technique consists of three parts:

  1. You need an array, to store the ‘restore points’ (much like Windows Restore Points). We will push states in it, when performing changes on the canvas, and will pop (and restore) states, out of it, when we press the ‘undo’ button. Here is how I have declared it: var restorePoints = [];
  2. As mentioned, before performing any change on the canvas, we need to store its state. We do this, by calling the toDataURL of the canvas, which exports the current drawing in your canvas, to a (PNG) image, encoded as base64. Basically, we ask the canvas to give us a text representation of the image that is drawn. Now we only need to insert this text, as an element of our restorePoints array. We do this using the restorePoints.push(…) command. The implementation of this step is in the saveRestorePoint() function in the example. Again – you have to call this method, before performing a change on the canvas!
  3. Now, how do we restore the canvas to its previous state, when the user clicks on an ‘undo’ button? We call a javascript method in which we have to create a new Image object in the memory, set its ‘src’ property to the last element in the restorePoints array (we do this using the array pop() method, which also removes the element from the array – exactly what we need!) and draw this image on the canvas (using the drawImage() function). So effectively what we do is: we take the last restoration point (image) and overlay it on top of the current state of the canvas. This will cause the effect of removing only the last change on your canvas, because we have restored to a point, which is previous to that change. We also need to remove the restoration point from the array, because we are currently ‘in it’ anyway.

And that’s about it. To summarize: maintain a javascript array of the previous states of the canvas. Before you perform a change on the canvas, save the current state, by exporting the canvas to a base64 encoded image. Store that state in the array of states, then do your change. When you want to ‘undo’, .pop() the last state from the canvas and draw it on top of everything. This will overwrite the whole canvas, but will only remove your last change, because the restoration point is before it.

I think there is no better explanation than a code sample, so go ahead and view the source of the demo. You can download the complete solution from here.

Cheers and Merry Christmas!

ChartPart for SharePoint

If you would like to generate some charts in Microsoft SharePoint 2007, after a quick search you will find that there is no such out-of-the-box functionality. You shouldn’t worry, though, as there is a free web part available at Codeplex, which has everything you need for your list-based charting needs. It is called “ChartPart for SharePoint” and is available here.

Prerequisites

In order to get it working on your server, you will need to have Microsoft .NET 3.5 SP1 and Microsoft Chart Controls for Microsoft .NET Framework 3.5 installed. The ‘installation package’ does not check for those prerequisites, so make sure you do that manually before you install. Most probably you already have .NET 3.5 SP1 installed, but chances are, the MS Chart Controls are not installed.

Installation

The deployment package consists of two WSP files (SharePoint solution deployment packages) – MSChartControls.wsp and ChartPart 2.0.wsp. First, you have to install the MSChartControls package. Login on your SharePoint server, start the Console (Start -> Run -> cmd) and type:

stsadm -o addsolution –filename MSChartControls.wsp
stsadm -o execadmsvcjobs

STSADM NOTE: Of course, you will have to choose between the convenience of not typing the full path to the stsadm.exe file or not having to type the full path to the WSP. So, you have to be in one of the two folders and type the full path to the other file.

This will add the solution to the SharePoint Central Administration -> Operations -> Solution Management. You can either use the User Interface it provides to deploy the added solution, or you can continue executing console commands, like this:

stsadm -o deploysolution -name MSChartControls.wsp -immediate –allowgacdeployment
stsadm -o execadmsvcjobs

Then, you have to activate the installed solution on Web Application level:

  1. Go to Central Administration
  2. Go to Application Management
  3. Select Manage Web Application Features
  4. Verify that you have selected the correct Web Application in the top right corner
  5. Click Activate on the Microsoft Chart Controls Feature

Now, you have to do something similar for the other WSP (Chart Part 2.0.wsp):

stsadm -o addsolution -filename “ChartPart 2.0.wsp”
stsadm -o execadmsvcjobs

Deploy the solution, either from Central Admin, or by using the console:

stsadm -o deploysolution -name “Chartpart 2.0.wsp” -immediate -allowCasPolicies -url <url>
stsadm -o execadmsvcjobs

Where <url> is the address of the web site you wish to deploy the webpart to. Now all you have to do is activate the feature on the selected Site Collection.

  1. Go to Site Settings for your top-level site
  2. Go To Site Collection Features
  3. Activate the ChartPart for SharePoint feature
  4. Now you can add ChartParts on every site in your Site Collection.

Usage

I created a new ‘Web Part Page’ on my site, to use for experimenting with the web parts. I chose ‘Full Page, Vertical’ layout template, as it  is one of the simplest and I preferred to have full width.

I chose to ‘Edit Page’ and clicked on ‘Add a Web Part’ link in the design mode of the page. A pop-up showing all available web parts appears and from there, I chose to add on the page the ‘ChartPart’ web part.


Once added on the page, you have to configure it. While the page is still in design mode, click on the little arrow down in the right upper corner of the web part. It will open a side menu. Click on ‘Modify Shared Web Part’. This will open the options of the web part.

Here, you can set the title of the web part (as it will appear on the page it is added to), the web site to pull data from, the specific list and its view. Then you have to select X and Y “Series” column. A bit of explanation… Only Number fields can be choses as “X-Series”. “Item Count” is always available to you. As “Y-Series” you have to specify a column of the SharePoint list.

To illustrate all this, I will configure my list to contain only two columns – “City” (single line of text) and “Population” (number field). Here is what my list looks like:

Now, I want to configure the Chart web part to visualize this statistics. I will set it up this way:

We click OK button and the generated chart looks like:

Customization

You can customize the chart in many ways. First. by selecting the ‘Chart Type’ for the chart. Choices are Column, Bar, Pie and so many others. Additionally, you can select ‘Style’ (Cylinder, Emboss, LightToDark, Wedge), which seems to work only on specific ‘Chart Types’. For example, it clearly works on a ‘Column’ chart type. Here is the difference between ‘Cylinder’ and ‘Wedge’:

There is many other fine tunings you can do, like color palette, size and etc. Also what’s really nice is that in the tooltip (when you hover a column in the chart) you will see an exact value, of the column.

Conclusion

ChartPart for SharePoint is a great component, if you want to visualize some statistics based on SharePoint list items. It is highly customizable, easy to install and use.

ASP.NET MVC: Create Facebook-like search box

In today’s article I will show you how to create your own Facebook-like (or LinkedIn-like) search box. If you haven’t seen what it looks like, here is an example:

You will notice that it features: autocomplete, icon, matches what you type and when you click a result item, it takes you to the appropriate page. That’s what our control in MVC will feature too. We will implement this in ASP.NET MVC2 and jQuery.


The Plan:
We will create an attribute and use it to decorate the action methods of our controllers. When we decorate an action, we will be adding metadata, such as the display name it should appear with in the search results and an optional icon. When the user types something in the search control, we will use jQuery to POST to a special controller, which will be enumerating all action methods in all controllers. While enumerating, it will be looking for a match between the search query and the metadata of each ‘indexed’ action method.

Implementation

Note: You can download the working demo project from here.

The Attribute
Ok, let’s start with the attribute. In your Code folder (if you don’t have one – go ahead and create it) add a new class and name it ‘ActivitySearchAttribute’. It will have two string properties – Text and ImageUrl. Implement it like that:


This is the attribute we will be using to decorate our action methods in the controllers. That way we will mark them as ‘searchable’.

Action-Method Decorations
Let’s create a couple of dummy controllers, with a couple of actions in each of them and decorate them with the newly created attribute. Like this:


As you can see, the icon property (“group.png” in the example) in the metadata is optional. Non-decorated action methods will not be returned as search results.

The Search Controller
Now let’s implement the search controller. Basically, what it will be doing is: receive a query string (e.g. “the”, as in the first image of this post), get all controllers, enumerate the action method of each controller, match the ‘Text’ property of the ‘ActivitySearch’ attribute (which we use to decorate the action) and then return an array of the matches with the appropriate URL to each result. Just like Facebook. I won’t paste the code here, as it is big, but you will find it in the attached sample project. The file is in Controllers and is named “SearchController.cs”.

Json Response
The search will be a dynamic thing. While the user types, we will be sending a request to a controller and we will be receiving a response. We need to create a class which we will serialize to JSON and use it as a response. In your Code folder, create another class and name it ‘ActivitySearchResultItem’. It will have three properties: Text, Url and Image. Implement it like that:

The Search controller will be returning an array of those, to the jQuery UI, as a JSON response.

The JavaScript / jQuery
Now, when we have the back-end, we just need to implement the front-end in jQuery and html. Note that our solution will be using a 3rd party library – jquery.autocomplete.pack.js
Additionally, we will put our javascript, in a file named “activitySearch.js”.

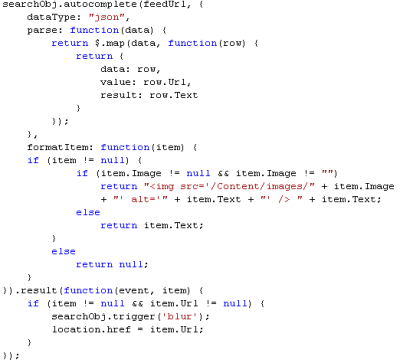
The auto-complete jQuery plugin will take care of attaching to the text-box and submitting/receiving data to/from the back-end controller. We just need to process and format the results. When the user clicks a result, he will be redirected to the URL property associated with the result item (see ‘Json Response’ above). Like that:

As you can see, the jQuery code expects that if there is an Image associated with the search result it should be in the /Content/images folder.

HTML
Here is how to setup your page which will contain the search-box control.


Conclusion
Now, when you have everything in place, start the project and just type in the search box some phrase which you know will hit a result. You should see something like:


The search results are clickable and when clicked, it will take you to the appropriate action. You can optimize the whole solution with various caching settings and techniques.

You can download the whole demo project here – https://github.com/hyankov/MvcActivitySearch

ASP.NET MVC2 – Creating a Display Template

ASP.NET MVC philosophy is “Skinny Controller, Fat Model, Stupid View“. The focus of today’s post is “stupid view”. What does this mean? Well, it means that you should avoid writing any logic in your views. A view should be as simple as wrapping the model’s properties in html tags.

If you are cornered, and must have some kind of a login in your view, it would be nice if it is neatly wrapped in a DisplayTemplate, so your code remains reusable, easy to read and maintain. What follows now is a tutorial on how to create one.


Problem: We have a Model which has a property “RemainingTime”, which is an integer and represents the estimated remaining seconds of some operation. We want to neatly format this time in the view, so that if it has a value of, let’s say, “5”, to be displayed as “5 seconds”. If it has value of “70”, to be displayed as “1 min, 10 seconds”, etc…

Solution: Create a reusable DisplayTemplate and use it to visualize the property.

We start by creating a new ASP.NET MVC2 “empty” project template. We don’t need the default authentication and home controllers, so that would do just fine.

As a first step, let’s create our Model. We’ll call it “RemainingTimeModel” and will have the integer property “EstimatedSeconds”. We will name the DisplayTemplate “SecondsFormatting”. So we go ahead and decorate the “EstimatedSeconds” property with the UIHint attribute, passing “SecondsFormatting” (which is the name of the DisplayTemplate we want to use) in its constructor. This attribute tells ASP.NET MVC which DisplayTemplate to use by default, for this property. Your code should look like this:

Second step is to create the actual DisplayTemplate. It needs to reside in the “Views/Shared/DisplayTemplates” folder, and be named “SecondsFormatting.ascx”. So, create a “DisplayTemplates” folder in your Shared views, then right click it and Add -> View. Check the ‘create partial view’ checkbox and give it the name we mentioned above. By default, this will create non-strongly typed ViewUserControl. We will extend this, to an integer. Open the “SecondsFormatting.ascx” file and change the Inherits=”System.Web.Mvc.ViewUserControl” to Inherits=”System.Web.Mvc.ViewUserControl . Now, when you refer to the Model object in this control, you are working with an integer. The Model that will be passed to this DisplayTemplate is the “EstimatedSeconds” property of the “RemainingTimeModel” model.

Now we just need to implement some logic in the control. Let’s do this:

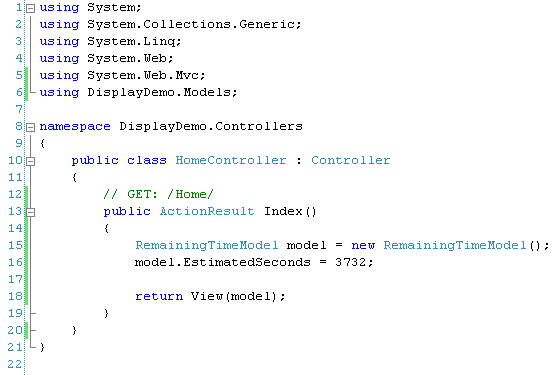
Ok, we have the model, which has the seconds property, and we have a DisplayTemplate for it. Now we jsut need to use it. For this purpose, we will create one simple controller, which creates a new instance of the model and initializes it, then passes the model to a view. In the view, we will have: Html.DisplayFor(model => model.EstimatedSeconds). Like that:

(Controller)

(View)

See how clean your View remains? No logic in there, just a DisplayFor html helper call.

We can now go ahead and try it out, with a couple of different values. It formats it accordingly. Please note that there are much easier ways to format the time and it was used here just as an example of what we should do if our view requires to have a logic. If we try with 3732 seconds, it should display “1 hours, 2 minutes, 12 seconds”.

Now you know how to encapsulate your logic in DisplayTemplates and keep your main Views clean and neat.


You can download the demo project from here.

jQuery in SharePoint

There are rumors jQuery might be included as part of SharePoint 2010. In an anticipation for that, today’s article aims to show what the integration between SharePoint 2007 and jQuery looks like, how to use it and what are the benefits.

So what is jQuery?
jQuery is a lightweight JavaScript library that emphasizes interaction between JavaScript and HTML. It was released in January 2006 at BarCamp NYC by John Resig. jQuery is free, open source software Dual-licensed under the MIT License and the GNU General Public License. Microsoft and Nokia have announced plans to bundle jQuery on their platforms, Microsoft adopting it initially within Visual Studio for use within Microsoft’s ASP.NET AJAX framework and ASP.NET MVC Framework whilst Nokia will integrate it into their Web Run-Time platform.

Simply put, it is a high performance rapid development, AJAX-enabled library on top of JavaScript.


API
There are a lot of articles and tutorials out there, on how to use jQuery in general. Here is the most essential documentation you will need – the jQuery API.

SharePoint integration
Integration between jQuery and SharePoint boils down to finding a smart way to get a jQuery reference in your pages.

Basically you can do this ‘manually’, which is well described here or you can use an automated integration solution (see below).

The manual approach essentially consists of two steps:
1) Deploying the libraries (js) to a location which can be accessed by the pages – that would be the LAYOUTS folder in the 12 hive
2) Loading the libraries on the pages – by modifying the master page, load the library specifically in the page you want to use it or other… It is all well described in the posted article.

The automated solution is a better one. You can get “SmartTools jQueryLoader for SharePoint” which does the integration for you. There is a good article which walks you through the installation process, so we are not going to that here. Make sure you watch the video, though.


Just try it out

If you just want to quickly try the magic of jQuery in SharePoint out, without bothering with the full integration you can do what is described here. The example in this article uses jQuery library which is hosted on Google Code (rather than in your 12 hive) and it dynamically queries the SharePoint web service to retrieve your current tasks, then visualizes them on the page. No need to develop a web part, it is just as simple as that!

You should also check this out, although for some reason I couldn’t get it to work. Basically this is supposed to let you test any jQuery code, from a small ‘editor’ on your home page.

Benefits
So what are the benefits of using jQuery in SharePoint?

AJAX
Well, obviously it adds AJAX functionality to your SharePoint web application. You can now retrieve and visualize data asynchronously, without putting any load on the SharePoint server. It also allows you to create more appealing and faster UI.

Page elements control and flexibility
Additionally, SharePoint allows you to change content structure for subsites, lists, libraries, views, columns, content types and the Web parts, but sometimes that’s not enough. Sometimes developers/designers or users need to make changes to the functionality and appearance of a SharePoint site in a way that is not allowed by the IT department. Since SharePoint Designer is usually restricted, we need an alternative way. That would be jQuery. Just to give you a concrete example of such situation, here is a guy who had to make the corners of the quick launch menu rounded.

jQuery saves development time
jQuery simplifies the way you traverse HTML documents, handle events, perform animations, and add Ajax interactions to your web pages. To summarize it one sentence only: couple of lines in jQuery allow you to do better what you could do with over 20 lines of JavaScript.

Many other…

  • You don’t have to check for null objects
  • CSS3 compliant and has a great CSS selector integration
  • Huge community which supports it. Many tutorials out there…
  • Simple and fast development
  • Lightweight!
  • etc…

Performance
jQuery 1.3 is fast. As in the “fastest JS framework out there”. Here are some nice tips on how to write a fast jQuery code.

Debugging jQuery in SharePoint
FireBug is the preferred way to debug jQuery (and JavaScript in general). Here is a nice article which goes into details.

Examples
http://www.endusersharepoint.com/THE “jQuery & SharePoint” website.
jQuery sparklines
Showing random images in SharePoint 2007 using jQuery
Highlight SharePoint List rows conditionally
Paging large content in SharePoint using jQuery
Many other…

SharePoint Web Services Wrapper

Recently I noticed that a common reason for developers to seek help on the MSDN forum is related to difficulties understanding and/or utilizing the SharePoint Web Services. You can’t blame the developers. It’s much more convenient to work with an Object Oriented API, rather than exchanging XML messages with a Web Service. For example, take a look at the Lists.asmx -> GetListItems. Of course it’s no rocket science, but it will sure save time if you could avoid dealing with the XML directly.


I spent some time researching if there is some kind of a library out there which provides ‘managed’ access to those Web Services. I.e. – work with .NET objects, rather than construct and parse XML elements. The closest thing I have found is this and it’s totally outdated and incomplete. At least it’s some reassurance to me that I am not missing the big picture and indeed, there might be people who would appreciate such framework.

So, I decided to start a project which will try to implement such .NET Object Oriented API around the SharePoint Web Services. Of course, for those corner weird cases (as well for the advanced developers), the underlying XML will still be accessible. Here is a good description of all the SharePoint services. My goal is to cover them all, eventually. I will start with the most commonly used ones.

It is hosted on CodePlex – http://spwebserviceswrapper.codeplex.com/
The project is not published yet, as there is no single line of code written yet. I will be doing this in my spare time. Once I shape it to my liking, it will become open source and everyone is welcome to contribute.

Got comments? Suggestions/Objections? There is a similar library already implemented? Please do let me know.

Hristo

SharePoint bug udating title of uploaded xml

Another interesting case…

Programmatically upload an xml file (extension should be .xml) to SharePoint document library. As soon as you upload it, try to change the Title field of the item.


So here is the code:

// We upload the file to SharePointSPFile file = Web.Files.Add(itemUrl, buff, true);Web.Update();

string newTitle = "Sample Title";SPListItem destItem = file.Item;destItem.File.CheckOut();// Try to change the titledestItem["Title"] = newTitle;destItem.UpdateOverwriteVersion();destItem.File.CheckIn(string.Empty,SPCheckinType.MinorCheckIn);

For any non-xml extension files it works, but for xml files the Title doesn’t change – it remains the same as the original name of the uploaded file. If you try doing this with another field of the item, it would work.

I came up with the following workaround:

SPFile file = Web.Files.Add(itemUrl, buff, true);Web.Update();

string newTitle = "Sample Title";SPListItem destItem = file.Item;destItem.File.CheckOut();destItem["Title"] = newTitle;destItem.UpdateOverwriteVersion();

// Work-around startdestItem["Title"] = newTitle;destItem.Update();// Workaround end

destItem.File.CheckIn(string.Empty, SPCheckinType.MinorCheckIn);

Anyone has clue what’s going on? Original MSDN forum thread is here.

Extending SharePoint Web Part

Hello!

SharePoint provides a lot of different out-of-the-box Web Parts. But sometimes we wish a particular web part behaved in a little different way, or have some small extra functionality. Or we may want to implement a heavily modified Web Part, based on already existing one.

Today, I will show you how to extend the functionality of an already existing web part.


We will take for example the SharePoint RSS Viewer. It loads an RSS feed and visualizes it in a web part on a SharePoint site. One of its visible properties in the UI is the Feed URL. It’s a static string and doesn’t allow any kind of dynamic parameters. Example:

Or

Those placeholders in my example are fictional, but you should get the idea of a dynamic value passed as a parameter to the service.

Our goal is to override the default behavior of the Feed URL field. We want to get to a point where we actually control how the Feed URL is being interpreted. We may want to replace placeholders with actual values, or do any other kind of adjustment of the URL, based on current and dynamic conditions. So here is the plan: we create a new web part, inherit the RSS Viewer web part and extend the Feed URL property.

Let’s start. Here is how the RSS View part settings look like in edit mode:

See the RSS Feed URL field? That’s what we are interested in.

Ok, start Visual Studio 2008 with the VSeWSS plugin installed. From the menu, start a new SharePoint -> Web Part project.

Give it a full trust

Change your namespace to something you prefer (for example, I will change it to HristoYankov). Rename the folder ‘WebPart1’ to ‘RSSAggregatorWebPartDynamicParam’. It will rename all classes and files for you. In the Solution Explorer, expand Properties and open AssemblyInfo.cs. Add this to the bottom:
[assembly: AllowPartiallyTrustedCallers]

and this to the top:
using System.Security;

Your Solution Explorer should look similar to:

Right click on your project, click on Properties, go to the Debug tab and set the SharePoint site URL you will be deploying to.

Open the RSSAggregatorWebPartDynamicParam.webpart file and set Title and Description to whatever you like.

Now, after your project is setup, starts the interesting part. Let’s inherit the RSS View control! What you need to do is…

Add this file as a reference – C:\Program Files\Common Files\Microsoft Shared\Web Server Extensions\12\ISAPI\microsoft.sharepoint.portal.dll. This is where the RSS View class is defined.

Open your RSSAggregatorWebPartDynamicParam.cs file and change your class from this:
public class RSSAggregatorWebPartDynamicParam : System.Web.UI.WebControls.WebParts.WebPart

to that:
public class RSSAggregatorWebPartDynamicParam : RSSAggregatorWebPart

And add this statement:
using Microsoft.SharePoint.Portal.WebControls;

Basically, we no longer inherit the basic WebPart class. Instead, we now inherit the whole functionality of the RSS Viewer web part and all of its user interface!

You can also delete this function, as we are not going to do any changes there.
protected override void CreateChildControls()

So far so good. Now let’s override the Feed URL property! Add this to your class:

[DefaultValue(""),Resources("RSSWebpart_Property_FeedUrl_Text","RSSWebpart_ToolPart_Group","RSSWebpart_Property_FeedUrl_Description"),Personalizable(PersonalizationScope.Shared),WebBrowsable(true)]public new string FeedUrl{get{return base.FeedUrl;}set{base.FeedUrl = value;}}

And add this statement:
using System.ComponentModel;

Three things to note here:
1. The FeedUrl property is the one which handles the URL which points to the RSS feed.
2. Note the attribute on top of the property. If you don’t add it, it won’t be visible in the UI
3. Note the ‘new’ keyword. This way we hide the underlying base FeedUrl property.

Ok, now we have control over the Feed URL. What we should do, is change the way FeedUrl is being returned. Change your get to look like:

get{return OverrideURL(base.FeedUrl);}

And create this function:

private string OverrideURL(string url){// TODO: Process the URLreturn url;}

So, in OverrideURL we can change any way we like the URL that is set in the User Interface and then return it modified. At this point, it is up to you how to utilize this capability.

For the purpose of the example, let’s just look for the string #current_date# in the URL and replace it with the current date.

private string OverrideURL(string url){return url.Replace("#current_date#", DateTime.Now.ToShortDateString();}

At the end, your code should look like:

using System;using System.Runtime.InteropServices;using System.Web.UI.WebControls.WebParts;

using Microsoft.SharePoint.WebPartPages;using Microsoft.SharePoint.Portal.WebControls;using System.ComponentModel;

namespace HristoYankov{[Guid("03badfa9-53e4-401a-bc60-28db88b202ac")]public class RSSAggregatorWebPartDynamicParam : RSSAggregatorWebPart{   public RSSAggregatorWebPartDynamicParam()   {   }

   [DefaultValue(""), Resources("RSSWebpart_Property_FeedUrl_Text", "RSSWebpart_ToolPart_Group", "RSSWebpart_Property_FeedUrl_Description"), Personalizable(PersonalizationScope.Shared), WebBrowsable(true)]   public new string FeedUrl   {       get       {           return OverrideURL(base.FeedUrl);       }       set       {           base.FeedUrl = value;       }   }

   private string OverrideURL(string url)   {       return url.Replace("#current_date#", DateTime.Now.ToShortDateString());   }}}

Now, right click your project and do ‘Deploy’. It should add a RSSAggregatorWebPartDynamicParam assembly to your GAC. When you go to your SharePoint site and do ‘Edit Page’ -> ‘Add Web Part’

you should be able to see your newly created web part listed in the pop up. Add it to the page. Put it in Edit Settings mode and set the Feed Url to something like:
http://servername/service/Param1=#current_date#

It will be replaced by:
http://servername/service/Param1=06/06/2009 (for example)

NOTE: I just noticed this – as soon as you set the URL which contains the ‘placeholder’, the web part which is still in edit mode starts showing it with a replaced value (the date). I believe that the underlying value is still http://servername/service/Param1=#current_date#. So perhaps, in the method OverrideURL we should be taking into consideration if the web part is in edit mode. And if it is – just return the original parameter that was passed. Something like:

private string OverrideURL(string url){if (this.NotInEditMode){// Not in edit mode, perform changesreturn url.Replace("#current_date#", DateTime.Now.ToShortDateString());}else{// We are in edit mode, return URL as isreturn url;}}

I will be checking this later. As usual, you can get the full source code here.

But basically that’s it. With minimum amount of code and effort, we have extended the functionality of an already existing web part, to something that serves our concrete needs.

Hope this was helpful!

SharePoint Solution Hello World Tutorial

Hi,

In this post, I will explain to you how to create your first SharePoint 2007 ASP.NET application. We will cover what tools you would need and what are the steps to creating a SharePoint Hello World app! I will keep the article short and clear on the necessary steps to be followed.


First, let’s start with the tools. You will need Visual Studio 2008 SP1 (preferably) this freely available plugin for it Visual Studio 2008 extensions for Windows SharePoint Services 3.0. It is a toolset for developing custom SharePoint applications: Visual Studio project templates for Web Parts, site definitions, and list definitions; and a stand-alone utility program, the SharePoint Solution Generator.

We assume that you have setup and you do have available a SharePoint site, on which we will be deploying our solution.

So, start your Visual Studio 2008. From the menu choose to start a new Project.

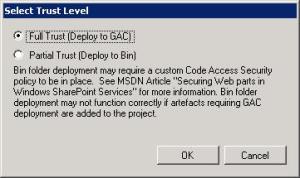
Visual Studio will show this window. Select GAC and proceed.

Your Solution Explorer would look like this, initially:

We need to create a couple of folders. Recreate the folder structure described in the screenshot below:

Right click on HelloSharePointWorld and select add new item. Select text file, but name it “Hello.aspx”

Put the following content in your newly created ASPX page.

<%@ Page Language="c#"Inherits="Hello, SharePointHelloWorld, Version=1.0.0.0,Culture=neutral, PublicKeyToken=3cf44204a7ad1f1e"MasterPageFile="~/_layouts/application.master"%>

<asp:Content ID="Content1"ContentPlaceHolderID="PlaceHolderMain"runat="server"><asp:Label ID="lblLabel1" runat="server" Text="Hello World!"></asp:Label></asp:Content>

Note the PublicKeyToken value. It will be changed later. Now, create a new class in the App_Code folder. Name it Hello.aspx.cs. Your directory structure should look like:

The content of your Hello.aspx.cs should read:

using System;using Microsoft.SharePoint.WebControls;

public partial class Hello : LayoutsPageBase{ protected void Page_Load(object sender, EventArgs e) { }}

Right click on your project, select Properties from the menu. Go to the Debug tab and set the hostname and port number of the SharePoint site where you want your project to be deployed.

Then save.

Now, right click on your project in Solution Explorer and rebuild it. Then right click on it and Deploy.

Now, open Windows Explorer and navigate to C:\WINDOWS\assembly. You should see an assembly called SharePointHelloWorld there. Right click it and select Properties.

Copy the Public Key Token (highlighted, note that it would be different for you) and click Cancel button. Now go back to your ASPX page in the project and replace the incorrect Public Key Token with the one you just copied.

Redeploy your application. Start Internet Explorer and navigate to http://%5Bserver name]:[port]/_layouts/HelloSharePointWorld/Hello.aspx

You should see something similar to:

Congratulations, you have created your first SharePoint solution. If you start the Central Admin for SharePoint and go to Operations -> Solution Management you should see a solution named sharepointhelloworld.wsp.

Let’s add one more modification. Open the Hello.aspx.cs file and change it to:

using System;using Microsoft.SharePoint.WebControls;using System.Web.UI.WebControls;

public partial class Hello : LayoutsPageBase{ protected Label lblLabel1;

 protected void Page_Load(object sender, EventArgs e) {     lblLabel1.Text = "Hello world! Time is: " +     DateTime.Now.ToString(); }}

By that, we utilize the code behind to output data on the screen. Rebuild, redeploy and refresh the page.

This is a good starting point for further learning by experimenting and example.

Of course, the full code for this project can be found here.

SharePoint 2010 overview

SharePoint is a collection of products and software tools by Microsoft that mainly provides collaboration functions, process management, searching and document management. Currently, the most popular version is SharePoint 2007. At this very moment Microsoft is working very hard on releasing the next version of the product – SharePoint 2010. This article will try to cover areas such as: what new features will be there, what changes from developer’s standpoint, what are the requirements, release date and others.

Naming
The product is no longer code-named “14”. The official name is Microsoft SharePoint Server 2010. The ‘Offfice’ part of the name finally drops out. The Office brand will no longer include Server side components (such as SharePoint). It now clearly refers to the client applications, such as Word, Excel and etc.

On a separate note, Exchange 2010 will be shipped separately of Office (beta is out already).

New Features

  • Groove (document collaboration application, acquired by Microsoft) is now being renamed and transformed into Microsoft Office SharePoint Workspace 2010.
  • SharePoint 2010 is not going to support Internet Explorer 6 (awesome). However, it will be supporting Firefox 3.x on Windows and perhaps even Firefox 3.x and Safari on non-Windows platforms.
  • Master Data Management (MDM) will be integrated with Office 14.
  • SharePoint 2010 will be able to interact with other CMS systems through CMIS.
  • You will be able to map SharePoint lists directly to database tables, which will provide great performance and scalability, especially on large lists.
  • There will be Silverlight support and maybe AJAX!
  • SharePoint Designer will support saving workflows to re-use for provisioning.
  • BDC might support Updating and Inserting data
  • Faceted Search
  • FAST Search for SharePoint. A new version of FAST Search for SharePoint at a lower cost.
  • “Web edit”“Microsoft has made it much easier for users to customize their own sites in SharePoint 2010. A new feature called Web edit allows site owners to edit their sites almost as if they were typical Office documents, making it easier for them to carry out common Web editing tasks like uploading and changing images or editing text.”
  • Other user-focused upgrades include the ability to use Office themes in SharePoint, for example by customizing a team site with the color palette of a SharePoint slide deck.
  • Read Visio documents in SharePoint
  • Improved administrative capabilities with a dashboard that uses the ribbon interface
  • Set of tools to monitor server farm health and data performance
  • Standardized UI across all Office products, browsers, mobile devices
  • Open API support


The free (and light) WSS version of the product will still be available, although there is no much information regarding it. Microsoft announced that it will get a lot of new features and will be a “great release”.


Developer tools
So, having said all that, what changes from the developer perspective? Is our life going to become easier, or even harder?

Microsoft announced “deep support for industry standards” and the main development tool will be Visual Studio 2010. It will ship with comprehensive support for development in all SharePoint areas – Web parts, features, solutions, content types, etc.

Deploy and debug from VS
You should be able to build, deploy and debug SharePoint applications directly from Visual Studio! If this is true, it will save us a lot of time!

Also, there will be a new Server Explorer window within VS, which we will use to explore SharePoint objects such as: Sites, Lists, Documents and other.

The Feature Designer embedded in Visual Studio 2010 will provide a detailed look at all the components of a Feature.

Package Explorer will provide you a WYSIWYG view to your package. You should be able to re-arrange items within the package by drag&drop!

There is extended support and integration of the Team System, if you are into this kind of a Source Control.

Requirements
It is a good idea to start getting prepared for this release of SharePoint, as it has very specific system requirements.

  • SharePoint 2010 will be 64-bit only
  • SharePoint Server 2010 will require 64-bit Windows Server 2008 or 64-bit Windows Server 2008 R2.
  • SharePoint Server 2010 will require 64-bit SQL Server 2008 or 64-bit SQL Server 2005.
  • As mentioned, IE 6 won’t be supported.

Out of the article:
So, what can you do today to get into the best shape for SharePoint Server 2010?
1. Start by ensuring new hardware is 64-bit. Deploying 64-bit is our current best practice recommendation for SharePoint 2007.
2. Deploy Service Pack 2 and take a good look at the SharePoint 2010 Upgrade Checker that’s shipped as part of the update. The Upgrade Checker will scan your SharePoint Server 2007 deployment for many issues that could affect a future upgrade to SharePoint 2010.
3. Get to know Windows Server 2008 with SharePoint 2007, this post is a great starting point.
4. Consider your desktop browser strategy if you have large population of Internet Explorer 6 users.
5. Continue to follow the Best Practices guidance for SharePoint Server 2007.
6. Keep an eye on this blog for updates and more details in the coming months.

And here are two interesting Q&As:

Q: Why are you only supporting the 64-bit versions of SQL Server 2005 or 2008 for SharePoint Server 2010?
A: This decision was based on our current test data for SharePoint Server 2010 and real world experience from customers running SharePoint Server 2007 with 32-bit SQL Server. SharePoint performance and scalability can benefit significantly from 64-bit SQL Server and the throughput increases are significant enough for us to make the difficult decision to only support SharePoint Server 2010 on 64-bit SQL Server 2005 or 2008. It has been our strong recommendation for some time that SharePoint Server 2007 customers take advantage of 64-bit SQL Server due to the inherent performance and scale benefits it can provide.

Q: Where can I find more information on the advantages of 64-bit hardware and guidance on how to migrate SharePoint from 32-bit to 64-bit.
A: These two TechNet articles are a good starting point;

Release date
According to Chris Capossela (senior vice president of Microsoft’s Information Worker Product Management Group) SharePoint 2010 will enter a technical preview in the third quarter of 2009 and will release to manufacturing in the first half of 2010.

Beta
Microsoft announced that it is now testing the software in an invitation-only technical preview, with a public beta to follow later this year. It focuses on a number of its enterprise customers and target specific enterprise deployment scenarios.

So, there is still some waiting to be done. But waste no time, instead, start preparing your 64-bit environments!

SharePoint regional settings double value bug

Here is an interesting one…

I had to set the regional settings of my SharePoint site to Hungarian, so the DateTime fields get localized properly. This has been discussed previously here.

However, I started experiencing problems with the double values. Explanation by example:
(myField is of type SPFieldNumber)


double myDouble = 123.45;
myField.DefaultValue = myDouble.ToString();

Basically, I am trying to assign the value of a type double variable as the default value of my SharePoint field (which I am about to render).

At this point, when I check (using Quick Watch in Visual Studio) the value of myField.DefaultValue it shows 123,45 (which is ok, for the localization I am using). However, myField.DefaultValueTyped shows 12345. Looks like SharePoint is ignoring the fact that the site is localized and does not consider ‘,’ to be in the role of a ‘.’

The solution I came up with is:
double myDouble = 123.45;
myField.DefaultValue = myDouble.ToString(CultureInfo.InvariantCulture);

Perhaps it is not the best, but at least the output now is:
myField.DefaultValue = “123,45”
myField.DefaultValueTyped = 123.45

Which is what is expected! Let me know if you know of a better way!

stsadm command line error

There is a common problem with stsadm being executed from the command line. For example, you run:
stsadm -o installfeature -name [featurename]

And you get “Command line error.” in the console. It is because you have copy/pasted the command from your browser or somewhere else. There is a problem with the encoding.

Solution: Type the command in the console window, don’t paste it.

Hope this helps.

Check if user belongs to K2 role

In your SharePoint (or other) / K2 solution, you may find yourself in a situation where you want to check if the current user belongs to a given K2 role. Perhaps, you want to allow only users who belong to particular K2 role to view a page, or you want to show a different page depending on the K2 role the user belongs to.


Surprisingly, K2 API does not provide a convenience method to do that. You have to implement it yourself. Even further, K2 Roles may contain ActiveDirectory groups and you will have to check if the current user belongs to them! In this article, we will discuss how all this is being done.

In the project where you will be implementing this method, make sure you have references to those libraries (which should be in the GAC):

  • SourceCode.HostClientAPI
  • SourceCode.Security.UserRoleManager.Management

First, let’s think about the signature of our method. It needs to return a boolean and receive a K2 role name as parameter:
public static bool CurrentUserBelongsToK2Role(string roleName)

That should do it. Now let’s start implementing the method. We need to get the name of the current user.
string loginName = WindowsIdentity.GetCurrent().Name;

(By the way, WindowsIdentity is in System.Security.Principal)

What we have so far is:
public static bool CurrentUserBelongsToK2Role(string roleName)
{
string loginName = WindowsIdentity.GetCurrent().Name;

// TODO: Implement further

return false;
}

Not much. We need to get an instance of K2’s UserRoleManager class. We will create a separate method which returns us an instance of this object:
public static UserRoleManager GetUserRoleManager()
{
UserRoleManager userRoleManager = new UserRoleManager();
userRoleManager.CreateConnection();
userRoleManager.Connection.Open(GetSCConnectionStringBuilder().ToString());

return userRoleManager;
}

And implement a second method, to get us a GetSCConnectionStringBuilder object.
public static SCConnectionStringBuilder GetSCConnectionStringBuilder()
{
SCConnectionStringBuilder connectionString = new SCConnectionStringBuilder();
connectionString.Authenticate = true;
connectionString.Host = ConfigurationSettings.AppSettings[“K2Server“];
connectionString.Integrated = true;
connectionString.IsPrimaryLogin = true;
connectionString.Port = uint.Parse(ConfigurationSettings.AppSettings[“K2ServerPort“]);

return connectionString;
}

Basically, this method will read K2Server and K2ServerPort keys from your config and use them for connection to K2. You are free to implement it any way you like. Now, when we have those two helper methods, we can finally do:
UserRoleManager userRoleManager = GetUserRoleManager();

Using the Role Manager, we will try to get an object representation of the K2 role we are checking against:
Role role = userRoleManager.GetRole(roleName);
if (role == null)
{
throw new Exception(“Role ” + roleName + ” not found!”);
}

So this piece of code will throw an exception in case the role we are trying to check does not exist. If it exists, our Role object will not be null. Now we need to enumerate the RoleItems within the role. Basically, it will give us all the users (or AD groups) included in this K2 role:
foreach (RoleItem roleItem in role.Include)
{
string currentRoleName = roleItem.Name;
}

Again, let’s see what we have so far:
public static bool CurrentUserBelongsToK2Role(string roleName)
{
string loginName = WindowsIdentity.GetCurrent().Name;

UserRoleManager userRoleManager = GetUserRoleManager();

Role role = userRoleManager.GetRole(roleName);
if (role == null)
{
throw new Exception(“Role ” + roleName + ” not found!”);
}

foreach (RoleItem roleItem in role.Include)
{
string currentRoleName = roleItem.Name;

// TODO: Implement here
}

return false;
}

So far so good, at least we are now able to enumerate all items within a K2 role! Let’s keep going and finish the implementation as marked in bold above.

The currentRoleName object could be returned to us in the format of K2:DOMAIN\Name. We need to normalize it to DOMAIN\Name (i.e. remove the ‘K2:’ part).
if (currentRoleName.IndexOf(‘:’) > -1)
{
currentRoleName = roleItem.Name.Split(‘:’)[1];
}

Now… the roleItem object we have (in the foreach statement) is of base type RoleItem. There are two classes which inherit from it – UserItem and GroupItem. This means, the current roleItem could be any of the two, which will help us understand if we are dealing with a single user or an ActiveDirectory group added to the K2 role. Let’s detect this:
if (roleItem is UserItem)
{
// TODO: Implement
}
else if (roleItem is GroupItem)
{
// TODO: Implement
}

Now we know when we are dealing with user and when with AD group. We just need to implement both cases. Implementing the UserItem case is as easy as comparing the currentRoleName to the loginName:
if (currentRoleName.ToLower() == loginName.ToLower())
{
// Found a USER match
userRoleManager.Connection.Close();
return true;
}

Implementing the GroupItem case is a little bit trickier. First, we need to implement a method which will return us a string array of the AD groups the current user belongs to, so we can later compare against them. Here is the code you will need:
private static string[] GetCurrentUserADGroups()
{
List groups = new List();

// Get the Groups of the current user
foreach (IdentityReference group in WindowsIdentity.GetCurrent().Groups)
{
// Ad the group to the list
NTAccount ntAcctGroup = group.Translate(typeof(NTAccount)) as NTAccount;
groups.Add(ntAcctGroup.Value.ToLower());
}

return groups.ToArray();
}

With the help of this method, we can get back to the implementation of the GroupItem case now:
else if (roleItem is GroupItem)
{
string[] loginNameADGroups = GetCurrentUserADGroups();
}

Then, we simply check if the loginNameADGroups contain the currentRoleName string (which in this case is an AD group).
if (loginNameADGroups.Contains(currentRoleName.ToLower()))
{
userRoleManager.Connection.Close();
return true;
}

And at the end of our CurrentUserBelongsToK2Role method we just have to add:
// No match found
userRoleManager.Connection.Close();
return false;

And that’s all! So, let’s see now how the whole thing looks:
public static bool CurrentUserBelongsToK2Role(string roleName)
{
string loginName = WindowsIdentity.GetCurrent().Name;

UserRoleManager userRoleManager = GetUserRoleManager();

Role role = userRoleManager.GetRole(roleName);
if (role == null)
{
throw new Exception(“Role ” + roleName + ” not found!”);
}

foreach (RoleItem roleItem in role.Include)
{
string currentRoleName = roleItem.Name;

// Is it K2:DOMAIN\Name ?
if (currentRoleName.IndexOf(‘:’) > -1)
{
// Get DOMAIN\Name
currentRoleName = roleItem.Name.Split(‘:’)[1];
}

if (roleItem is UserItem)
{
if (currentRoleName.ToLower() == loginName.ToLower())
{
// Found a USER match
userRoleManager.Connection.Close();
return true;
}
}
else if (roleItem is GroupItem)
{
string[] loginNameADGroups = GetCurrentUserADGroups();

if (loginNameADGroups.Contains(currentRoleName.ToLower()))
{
userRoleManager.Connection.Close();
return true;
}
}
}

// No match found
userRoleManager.Connection.Close();
return false;
}

Of course, you can find the whole project attached here.

How to create a K2 SmartObject

How does K2[blackpearl] integrate with other systems? One standard way to do this is through Web Services. And how does K2[blackpearl] integrate with Web Services? It is done through SmartObjects. So we have: K2 SmartObject Web Service Other System


“A K2 SmartObject can encapsulate data that does not currently reside in an existing system, such as data about an employee’s extracurricular activities, his or her family, or hobbies and interests. By using a SmartObject for employee information, all data about an employee is accessed in the same place, and updates are applied to the data at its source. It is important to remember that SmartObjects do not store or cache data. Once created, a SmartObject can be used and reused in a variety of ways; within K2 Designer for Visio, integrated for use in an InfoPath form, a workflow deployed via K2 Studio, in a report, in SharePoint, etc.”

SmartObject is all that and also it is the link between K2 and Web Services. So let’s see step by step how do we consume a Web Service method.

1. Create Web Service
First, let’s create a simple web service which we will be consuming later. For the purposes of the demonstration, it will be as simple as returning you the sum of two values.

I will use Visual Studio 2008 to create a new ‘ASP.NET Web Service Application’ project.

Let’s create the simple method ‘Sum’. See screenshot below:

Of course, you should test it first:

For the curious, it returned 3 😉

Ok, now we need to publish it somewhere in the network and make sure we can access it! Right click the solution, Publish.

‘Publish’ it somewhere on your local hard drive and make sure you map it in IIS to a virtual directory. You can do that by going into IIS, choose existing site (or create a new one), right click on it -> New Virtual Directory, browse to the path where you Published the service and keep clicking Next.

Let’s assume you published your service to http://localhost:86/SampleService/SampleService.asmx, which in the local network (if you have one) maps to http://192.168.0.1:86/SampleService/SampleService.asmx.

We are done with the service, it’s in the network, it works, it is ready to be registered as a service instance.

2. From K2 Workspace add it to Dynamic Web Service
Ok, now we have to add it to the ‘Dynamic Web Services’ list. Open your K2 Workspace. Go to Management -> Management Console -> Expand the servername -> SmartObjects -> Services -> Dynamic Web Service.

Click on the Add button and populate the URL field.

Click Next. In the next screen set names to something that makes sense to you and click Save. Let’s call it ‘Sample Service’.

You have now registered a service instance. Let’s verify that by going to the K2 server and opening C:\Program Files\K2 blackpearl\ServiceBroker (or C:\Program Files (x86)\K2 blackpearl\ServiceBroker) and run BrokerManagement.exe. On the first screen, click on ‘Configure Services’.
Under services -> DynamicWebService -> serviceinstances there should be an instance with a name ‘SampleService‘.

3. Create SmartObject
We are good to create a SmartObject around it now. Start a new instance of Visual Studio and create a new K2 SmartObject project.

The first thing you do is switch to Advanced mode.

Then Remove All methods that were created for you. We will start from scratch.

Then click on +Add and run the wizard that shows up in Advanced mode (it’s a checkbox on the first page).

Name the method Sum, make it Read type.

In the next screen, Configure Method Parameters, we will add the two parameters that we have to pass to the method – intA and intB. Make them ‘Number’s.

At the end, it should look like this:

Click Next. On the next screen you have to select the Service Method we will be executing. This is easy. First click Add, to start adding a service method call to the SmartObject. A new popup will show. There is a field ‘Service Object Method’ and next to it there is a ‘…’ button. Click on the button. It will open the Context browser. Browse through ServiceObjects Server -> Sample Service -> Sum -> Read.

Click Add in the Context Browser. You will see:

We need to map some fields now. See the ‘a’ and ‘b’ input properties? They are the web service method input parameters. We have to ‘bind’ them to the intA and intB fields we created for the SmartObject.

Click on the first one (‘a’), click ‘Assign’ button and a small pop up will appear. Set ‘Map to’ to ‘SmartObject Method Parameter’ and from the second dropdown select ‘intA’.

Then click ok and do the same thing for ‘b’, but select ‘intB’ instead. For ‘ReturnValue’ – click on it, Assign, set ‘Map To’ to SmartObject Property (i.e. you are storing the result in a property of the SmartObject). Then click Create.

You should end up with:

Click OK and finish the wizard.

Make sure you name your SmartObject properly.

4. Deploy
Right click the solution and do Rebuild. It should compile with no errors. Let’s deploy the SmartObject to our K2 Server. Right click the project -> Deploy. Follow the wizard (Next, Finish) and your SmartObject should be deployed.

5. Test
Let’s test your SmartObject. Log into the K2 server and go back to C:\Program Files (x86)\K2 blackpearl\ServiceBroker. Run the file SmartObject Service Tester.exe.

Expand the SmartObjects section, find your SampleServiceSmartObject, expand it until you see the Sum method.

Right click on it, Execute method. Populate the input fields and click ‘Sum’ button. Promptly, you should see the result displayed.

We just invoked the SmartObject, which talked to the WebService, retrieved result for us and was visualized in the test utility. Everything works perfectly, your SmartObject is ready to be consumed from a workflow!

6. Consume in Workflow
Create a new K2 Process Project in Visual Studio. I will reuse the K2 solution we already have and just add the new project to it.

From the Toolbox, drag and drop a new SmartObject event. On the second page, Wizard will prompt you for SmartObject Method. Browse to our Sum method in the SampleServiceSmartObject.

Click Add. It should look like this:

On the next screen, you have to provide values for the SmartObject input properties. This could be K2 DataFields from your process, or actual hardcoded sample values. For the purpose of the demo, we will just bind them to ‘2’ and ’54’. Select the property, click Assign button, set value, click ok. It should look like this:

On the next screen, we have to bind the return result to something. Let’s bind it to a DataField in the process which we will create. Click on the ReturnValue, click ‘Assign’, in the popup click on the ‘…’ button which will open the Context Browser. In this browser, either select already existing DataField, or create a new one on the fly (right click -> create). Make sure the field is Integer (for this demo). Select it, click ‘Add’, then ‘Ok’ in the pop up.

It should look like:

Click finish. You just finished adding a SmartObject event to your workflow. After this event is executed, you will have the value of ‘a’ + ‘b’ in the SumValue data field. I.e. you are consuming the SmartObject (and hence the Web Service).

Now you just need to finish the rest of the workflow 😉

7. Change the URL of the service
What if the address of your Web Service changes? Simple, go to the K2 server and open the C:\Program Files (x86)\K2 blackpearl\ServiceBroker folder. Run the BrokerManagement.exe app. On the first screen, click on ‘Configure Services’.

Find your service instance again:

Right click on it -> Configure Service. It will open a pop up. There you can change the URL field and click Save.

And that’s it, your service instance is now pointing to the right URL.

Basically that’s all. Now you know how to consume web services from your K2 Workflows, utilizing SmartObjects!

Hope this helps!

SharePoint bug tracking

So you have this SharePoint project you are working on… And as with any project, you need a bug tracker in order to communicate properly with the QAs and BAs in the company. What do you use? OnTime? Mantis? Bugzilla?

Why not SharePoint itself? It’s already (presumably) set up for you, users are familiar with it and you are only couple of steps away from setting up your own Issue Tracker.


To get it up and running, here is what you should do, step by step:
1. Open your SharePoint web site as admin

2. Click on ‘View All Site Content’ (usually top left) or open http://server:port/_layouts/viewlsts.aspx

3. Click on ‘Create’ to create a new list (shortcut: http://server:port/_layouts/create.aspx)

4. From the ‘Tracking’ column select ‘Issue Tracking’

5. Type in the name and description of the list where issues will be tracked

You may want to select ‘Yes’ on ‘Send e-mail when ownership is assigned’, to send emails to the users assigned to issues.

6. Click ‘Create’ button and your bug tracker is created. You should see a list with the name you have given on step 5. This is the tracker, open it. Click ‘New Item’ to see the default fields and their values you get.

7. Time to customize according to your needs. Go to the List Settings of your issue tracking list.

8. Scroll down to the Columns section. You will want to modify the highlighted columns – Issue Status, Priority and Category, for starter.

9. Click on any of them, let’s say ‘Issue Status’. Scroll down to the ‘Additional Column Settings’

You can now change the possible statuses your issues may have. For example, you may want to add ‘Acknowledged’, ‘Postponed’, ‘Invalid’, ‘Cannot fix’, etc… You may also change the default value or make the field required (a smart choice). When you are happy with your changes, click Ok.

10. Do the same for Category and Priority.

11. You can extend your tracker further, by adding extra columns. Let’s say, Product (as you may be working on different products at the same time) or Version (as your product may have many production versions). To do this, go to the Settings of the list again (as in step 7). Scroll down to columns and click Create Column.

12. Type in the name of your column and select its type. In this case, I will name it ‘Product Version’ and make it a dropdown list.

13. Make the column required (if you want to), specify the available choices and select the type of the control (dropdown, radio buttons or check boxes).

Then click Ok and you are all set.

14. Let’s test your bug tracker. Go to the list and create a new item

15. Fill all the fields you want to and click Ok. You have now logged a new Issue.

16. To customize your tracker further, you may want to create new Views, which sort and arrange the items in categories, assignees and what not

17. You may need to add users (give permissions) to the site or the list.

Now you have your own tracker, embedded in your SharePoint environment. Hope this was helpful!

SharePoint Development tools list

SharePoint development is not always as straight-forward as we all want it to be. However, there are a lot of tools which can make our job easier. Here is a list of some of our favorite tools for SharePoint development:


SharePoint Manager 2007
“The SharePoint Manager 2007 is a SharePoint object model explorer. It enables you to browse every site on the local farm and view every property. It also enables you to change the properties (at your own risk). This is a very powerfull tool for developers that like to know what the SharePoint holds of secrets. “

STSDEV: Simple Tools for SharePoint 2007 Development
STSDEV is a proof-of-concept utility application which demonstrates how to generate Visual Studio project files and solution files to facilitate the development and deployment of templates and components for the SharePoint 2007 platform including Windows SharePoint Services 3.0 (WSS) and Microsoft Office SharePoint Server 2007 (MOSS).”

WSPBuilder
“A SharePoint Solution Package (WSP) creation tool for WSS 3.0 & MOSS 2007”

Windows SharePoint Services 3.0 Tools: Visual Studio 2008 Extensions, Version 1.2
“Tools for developing custom SharePoint applications: Visual Studio project templates for Web Parts, site definitions, and list definitions; and a stand-alone utility program, the SharePoint Solution Generator.

U2U CAML Query Builder
“CAML (Collaborative Application Markup Language) is an XML-based query language that helps you querying, building and customizing Web sites based on Windows SharePoint Services. The XML elements define various aspects of a WSS site. The tool will help you build, test and execute your CAML Queries. “

I don’t think anybody wants to write CAML Queries ‘by hand’

SharePoint Timer Scheduler
“Sharepoint Timer Scheduler gives you a way of running your Timer Job from a list in the Root Web of your Sharepoint site. Excellent way of giving Site Administrators access to Timer Jobs so they can be run immediately or rescheduled. No need to code custom SPJobDefinition classes.”

Basically, this is a ‘tool’ which allows you to reschedule timer jobs without the need to redeploy a solution! Great!

Pako Simeonov’s Tool
Pako Simeonov wrote a great tool which fixes errors of the kind ‘Feature {Guid} for list template is not installed in this farm. The operation could not be completed’

What are your favorite tools?

SharePoint DateTime Format and Regional Settings

Now, how exactly do you control the DateTime string representation and formatting in a SharePoint application?

Normally, in an ASP.NET Web Application, it depends on the Regional Settings (Control Panel -> Regional and Language Options) of the user running the application pool of the site. Unless you override the Culture options in the code.


So when I tried to ‘localize’ the DateTime representation for my SharePoint site, by changing the app pool user’s Regional settings, at first I was surprised it didn’t do the job. DateTime was still shown in the default en-US format.

This means SharePoint overrided the Regional settings of its application pool user. It took me a couple of minutes before I realized that for SharePoint applications, the DateTime formatting is controlled by opening the site -> Site Actions -> Site Settings -> Site Administration (column) -> Regional Settings

There, you have the option to fine tune the regional settings for the site, which will also affect the DateTime formatting.

After setting it to the one you desire, you save the settings and next time you open the site, DateTime will be formatted according to the locale you have selected.

Hope this helps!

Append new line to SPFieldMultiLineText in SharePoint

Do you have a multiline text box field in your SharePoint site and ever wondered how to append a new line to it? Are you confused whether you should use \r\n, Environment.NewLine or perhaps even #xD #xA to mark a line break? Allow me to save you the time and give you a straight answer.


The first thing you have to do is convert the SPListItem that represents your field into SPFieldMultiLineText.
SPFieldMultiLineText multilineField
= item.Fields.GetField(COLUMN_NAME) as SPFieldMultiLineText;

Then you can use its GetFieldValueAsHtml method to get the value in the form of HTML (which will preserve the multiple lines):
string text = multilineField.GetFieldValueAsHtml(item[COLUMN_NAME], item);

You should use ‘<br/>’ as a line break:
string sharePointNewLine = “<br/>”;
text = text
+ sharePointNewLine + sharePointNewLine
+ “Appended Text:” + sharePointNewLine
+ “This text is appended on a new line!”;

And after that you just update your item:
this.Web.AllowUnsafeUpdates = true;
item[COLUMN_NAME] = text;
item.Update();
this.Web.AllowUnsafeUpdates = false;

So if the original text in the field was “Test test test“, after executing this code, it would read:
Test test test

Appended Text:
This text is appended on a new line!

Simple? As long as you remember that text should be retrieved as HTML and you should use ‘<br/>’ as a line break, yes.

Here is the full code snippet, ready to use:
public void AppendTextToMultiline(SPListItem item)
{
string COLUMN_NAME = “Multiline Column Name”;
string sharePointNewLine = “<br/>”;
SPFieldMultiLineText multilineField = item.Fields.GetField(COLUMN_NAME) as SPFieldMultiLineText;

if (multilineField != null)
{
// Get the field value as HTML
string text = multilineField.GetFieldValueAsHtml(item[COLUMN_NAME], item);

// Append the text
text = text
+ sharePointNewLine + sharePointNewLine
+ “Appended Text:” + sharePointNewLine
+ “This text is appended on a new line!”;

this.Web.AllowUnsafeUpdates = true;
item[COLUMN_NAME] = text;
item.Update();
this.Web.AllowUnsafeUpdates = false;
}
}

Hope this helps!

Beware using GetFieldValueAsHtml or GetFormattedValue with DateTime fields

Watch out when using GetFieldValueAsHtml or GetFormattedValue with SharePoint DateTime fields! They both expect the value to be in UTC! However, SPListItem[FieldName] returns its value in Local Time zone and marks it as Unspecified.


Basically, what you have to do prior to calling one of the two methods above is make sure your time is in UTC:

DateTime localTime = (DateTime)listItem[“SomeDateTime”];
DateTime universalTime = this.Web.RegionalSettings.TimeZone.LocalTimeToUTC(localTime);
string correctlyConverted = listItem[“SomeDateTime”].GetFieldValueAsHtml(universalTime);

The right way to SPWeb.EnsureUser in SharePoint

At some point of time you may need to call (SPWeb).EnsureUser from your custom SharePoint web application. But this method can not be called by everyone, as it requires some high level permissions. You may also get an error similar to this one:


Your solution is to wrap the EnsureUser within RunWithElevatedPrivileges call. However, there is a big catch. If you use instances of SPSite or SPWeb, obtained prior to the RunWithElevatedPrivileges block, it won’t work as expected because they are already associated to a non-elevated security context.

To illustrate it with code, here is WRONG usage of RunWithElevatedPrivileges:
SPWeb web = [… somehow obtained here…];

SPSecurity.RunWithElevatedPrivileges(delegate()
{
// NOTE: Wrong, do not use
SPUser someUser = web.EnsureUser(web.CurrentUser.LoginName);
});

And here is a CORRECT one:
SPWeb web = [… somehow obtained here…];

SPSecurity.RunWithElevatedPrivileges(delegate()
{
using (SPSite elevatedSite = new SPSite(web.Site.ID))
{
SPWeb elevatedWeb = elevatedSite.OpenWeb(web.ID);
SPUser someUser = elevatedWeb.EnsureUser(web.CurrentUser.LoginName);
}
});

Basically we used the IDs of the Web and Site objects, obtained prior to the elevated block, and used them to create Site and Web object within the elevated context.

SPTimerScheduler for SharePoint Improvement

At some point of time, you will need to create a Timer Job (scheduled task) for your custom SharePoint web solution. For example, you may need it to synchronize two systems.

Out of the box, you can create a SharePoint timer job, by inheriting the SPJobDefinition class and then creating a timer job installer, by inheriting SPFeatureReceiver. What this basically does is, during the activation of your feature, the installer will kick in and add your timer job to SharePoint timer jobs list. On deactivation of the feature, the timer job will be ‘uninstalled’. This is associated to a huge inconvenience – you can’t change the schedule of your task, unless you change your source code and redeploy. In a production environment this may cause a big stir.


This is where you can use SPTimerScheduler! It is really convenient and easy to install. After deploying the solution and activating the feature, you get a ‘TimerJobSchedule’ list, where you can define all your timer jobs. You just ‘point’ to the assembly, class and method you want to execute, pass constructor parameters (optional) and you are done! It allows for simple and easy task (re)scheduling, which is generally why you want to use this solution in the first place.

If there is one nice thing about the native SharePoint timer jobs, it is the fact that if your code throws an exception during execution, it will be logged by the SharePoint timer service in the Event Log. This is missing from SPTimerScheduler!

The purpose of this article is to show you how to extend this custom solution functionality so you can see what the error was, if any.

First, you need to download the source code of SPTimerScheduler from here. As of right now, the latest release is 1.1.0.0.

After you download the source, open SharePointerTimerJobScheduler.sln in Visual Studio. It may prompt you to remove the version control associated to the project, to which you agree.

We will start by adding one more column to the ‘TimerJobSchedule’ list, which will store the latest Exception message. Please note that the project stores the list template as TimerJobSchedule.stp file, which you can not edit directly. Generally, what you have to do is import the stp file to SharePoint, create an instance of this list type, edit it by adding one more column – LastExceptionMessage (multiline, plain) and then export it again. Overwrite the old stp file with the newly exported one. Here are detailed instructions:

1) Go to your SharePoint web site -> Site Actions -> Site Settings. Under ‘Galleries’, click on ‘List Templates’.

2) Click Upload button -> “Upload Document”

3) Browse for “12\TEMPLATE\FEATURES\SharePointerTimerJobScheduler\TimerJobSchedule.stp” file from the source code and upload it.

4) Now you have added the SPTimerScheduler as a type of a custom list. Create a new instance of it. Click on ‘Create’ and under ‘Custom Lists’ you should see ‘TimerJobSchedule’. Click on it.

5) Give the list instance a name and click Create. The go to the settings of the list and under ‘Columns’ click ‘Create column’ link.

6) Name the column ‘LastExceptionMessage’ and make it of type ‘Multiple lines of text’, ‘Plain text’ and click ok.

7) Go to the Site Settings -> List templates again and delete the TimerJobSchedule list template you imported on step 3. You need to do this as preparation for the next step.

8) Now go to the list you created (of type ‘TimerJobSchedule’. Remember, you gave it a name at step 5) and open its settings. Under ‘Permissions and Management’ there is a link ‘Save list as template’. Click on it.

9) Under ‘file name’ and ‘template name’ fields call it ‘TimerJobSchedule’ as it used to be when you first imported it. Do not include content and click OK button.

10) Go to site settings again -> List templates. You should see the TimerJobSchedule template there. Click on the Name field of the item, which is a link. Save the file TimerJobSchedule.stp back to 12\TEMPLATE\FEATURES\SharePointerTimerJobScheduler.

You have now effectively added one more column to the list – LastExceptionMessage.

Now we need to edit the code too. You should have the solution open in your Visual Studio. Open TimerJobScheduler.cs for edit and go to line 140. This is the catch statement, right after the ‘RunTheTimerJobInstance(Item);‘ block. As you can see, logging logic is not yet implemented there. What you want to do is add the following code in this catch statement:

Item[“LastExceptionMessage”] = NowDateTime + ” – ” + ex.Message;

Basically it will write a time stamped exception message into the ‘LastExceptionMessage’ column you have created earlier. As you can see, we don’t even need logging components such as log4net at this point. We are using the column to store the message.

Right click the ‘SharePointerTimerJobScheduler’ project in Visual Studio and select Properties. Go to the Build Events tab and take a look at the “Post-build event command line” text box. There is an entry saying:
makecab /f solution.ddf

Change it to:
makecab /f solution.ddf

I.e. – remove the ” character at the end of the line, as it is there by mistake (I guess).

There is also an error in TimerJobSchedulerFeature.cs file of the source. Find the line:
AddListTemplateToGallery(@”C:\Program Files\Common Files\
Microsoft Shared\web server extensions\12\
TEMPLATE\FEATURES\TimerJobScheduler\TimerJobSchedule.stp”);

And replace it with:
AddListTemplateToGallery(@”C:\Program Files\Common Files\
Microsoft Shared\web server extensions\12\
TEMPLATE\FEATURES\SharePointerTimerJobScheduler\TimerJobSchedule.stp”);

I have notified the developer about those findings here.

After you are done with all of the above, rebuild the solution. The “Deployment\SharePointerTimerJobScheduler.wsp” will be refreshed. You need to redeploy it. You can do that by copying ‘SharePointerTimerJobScheduler Source\Deployment\SharePointerTimerJobScheduler.wsp‘ (which is the output of the source project) into ‘SharePointerTimerJobScheduler Release 1.1.0.0‘ (which was the release folder of the project, if you downloaded it. And you should!).

After deployment, by running ‘SharePointerTimerJobScheduler Release 1.1.0.0\Install Feature.cmd‘ (and re-activation of the ‘SharePointer Timer Job Scheduler’ site feature) make sure the ‘LastExceptionMessage‘ column is visible in your default list view, so you can monitor it for errors.

And that’s all. Now just make sure that the method you are executing as a timer job, throws a meaningful exception, which will be visualized in the list column!

Sending email from SharePoint

Did you ever need to send an email out, from your SharePoint custom web application? When you have such a task, perhaps the first idea that you have is to use System.Net.Mail namespace. However, this requires that your application maintains a setting for the SMTP server, reply address and etc. Wouldn’t it be easier if you could delegate the task of storing this configuration to SharePoint (and its Administrator) and instead, just focus on sending out the actual email?


Your solution is the Microsoft.SharePoint.Utilities.SPUtility class! It has the very convenient method ‘SendEmail‘. This is basically SharePoint’s native functionality for email delivery.

The first thing you (or the SharePoint Administrator) need to do is setup the Outgoing email SMTP server. Open Central Admin -> Operations -> Outgoing E-Mail Settings.

There, you need to set the Outbound SMTP server, From address and Reply-to address.

And this is exactly how you delegate SMTP setting storage to SharePoint. Now, how do you actually send email from your code?

First, it is always a good idea to check if the email server is set:
bool isEmailServerSet = SPUtility.IsEmailServerSet(web);

If this returns false, you should not bother trying to send the email. Instead, show an error message or notify the SharePoint administrator, to check the settings of the server. If it returns true, you are good to go:
SPWeb web = SPContext.Current.Web;
bool appendHtmlTag = false;
bool htmlEncode = false;
string toAddress = “test@example.com”;
string subject = “Subject”;
string message = “Message text”;
bool result = SPUtility.SendEmail(web, appendHtmlTag, htmlEncode, toAddress, subject, message);

In some cases, you may need to run this code with elevated privileges:
SPSecurity.RunWithElevatedPrivileges(delegate()
{
bool result = SPUtility.SendEmail(web, appendHtmlTag, htmlEncode, toAddress, subject, message);
});

SendEmail method returns a boolean, indicating if sending the email was successful or not.

However, there is a catch in using SPUtility.SendEmail. Internally this method relies on having a SPContext. In other words – if you are trying to use SPUtility.SendEmail from a SharePoint timer, it will fail, because there will be no context. This is when you have no other choice, but use System.Net.Mail. But how can you still benefit from SharePoint storing your SMTP settings? You do it this way:

SPWeb web = new SPSite(“http://example&#8221;).RootWeb;
string toAddress = “test@example.com”;
string subject = “Subject”;
string messageText = “Message text”;
string replyTo = web.Site.WebApplication.OutboundMailReplyToAddress;

MailMessage message = new MailMessage(replyTo, toAddress, subject, messageText);
message.IsBodyHtml = false;

string smtpAddress =
web.Site.WebApplication.OutboundMailServiceInstance.Server.Address;

SmtpClient smtp = new SmtpClient(smtpAddress);
smtp.Send(message);

So what did we do here? We use .NET’s native MailMessage and SmptClient classes, but we still read the configuration from the SharePoint site we opened by URL.

Sample SharePoint project localization Part 2 of 2

Hello,

This article assumes you are already familiar with Part 1 and the post preceding it.

Here, we discuss how to localize the content of the SharePoint custom web site project you already have created.


Normally, your ASPX page content would be similar to the following:


We want those ‘hardcoded’ strings to be localization enabled.

1. Create your default resource file.
You can create a subfolder ‘Resources’ in your project and put it there. Give it a specific name, in our case it is SampleLocalization.resx

2. Extract the strings we want to localize, into a resource file.
Let’s assume we want to have the page title, button text and greeting message localized. We need to create a resource entry for each one of them. Your resource file should look similarly to:


3. Modify the Page attribute to contain Culture and UICulture tags.
It should be similar to:

Inherits=”SampleCode.Localized, SampleCode, Version=1.0.0.0, Culture=neutral, PublicKeyToken=[Public Key Token]” Culture=”auto” UICulture=”auto” %>

4. Modify your page to refer to the resources, rather than the hardcoded strings


5. Make a copy of your resource file. This will be our second language. Let’s make it Bulgarian.
Name it ‘SampleLocalization.bg.resx’. Open it for editing and translate the text. For your convenience, here are the strings:

Button_Text – Бутон текст
Greeting – Здравейте, това е тест
Page_Title – Това е заглавието на страницата

Make sure you store it in the Resources folder, next to your SampleLocalization.resx file.

6. web.config modification
Open the web.config of the website that hosts your template page. Find (or add) your globalization node and modify it to contain Culture and UICulture attributes, equaling ‘auto’.


7. Deployment
Do a full deploy of your project. Also, don’t forget to copy your *.resx files (both of them) into the WSS VirtualDirectories App_GlobalResources. The path usually is:

C:\Inetpub\wwwroot\wss\VirtualDirectories\[Port Number]\App_GlobalResources

Open the web page in the browser and see the result. You can set language preference through the settings of your browser.

For IE:
Tools -> Internet Options -> General Tab -> Languages -> Add / Move Up / Move Down

For FF:
Tools -> Options -> Content tab -> Languages (bottom) Choose button -> Add / Move Up / Move Down

Add Bulgarian. Try how it works when Bulgarian is a first preference, or when it is last.

In English:


In Bulgarian:


Hope this is helpful,
Hristo Yankov

Sample SharePoint project localization Part 1 of 2

Hello,

This is a step-by-step tutorial on how to create a localized SharePoint custom web application. In this first part, we will discuss the creation of the sample web application itself, while the second one, will emphasize on the localization.

Prerequisite is a Visual Studio 2008 with WSS extensions 1.3. You can also work with Visual Studio 2005, but you will have to do part of the deployment manually.

1. Start Visual Studio and create new project of type SharePoint.

I entered ‘SPLocalization’ as name for the project.

2. Select “Full Trust”

Note: Check debug tab of Project Setting to ensure it contain correct path to your SharePoint server.

3. Add new item to our project

4. Select ‘Template’ element in SharePoint section. Change file name to ‘LocalizedPage.aspx’

— @page { size: 8.5in 11in; margin: 0.79in } P { margin-bottom: 0.08in } –>

5. Now you should see project structure like this:

6. Create subfolder LAYOUTS under Template folder

7. Create subfolder SPLocalization under LAYOURS folder

8. Move LocalizedPage.aspx to SPLocalization folder (I use drag and drop the file). Now you should have the following structure:

9. Now let’s create a class that extends SharePoint layout pages. Add new class to your project.

10. Name it ‘LocalizedPage.aspx.cs’ and click “Add” button

<!– @page { size: 8.5in 11in; margin: 0.79in } P { margin-bottom: 0.08in 11. Now few other steps …

First add references to SharePoint and SharePoint.WebControls

using Microsoft.SharePoint;

using Microsoft.SharePoint.WebControls;

Secondly make your class public, partial and derived from LayoutsPageBase

You should see something like this:

Now, since we have chosen GAC deployment model, we need to deploy our solution to Global Assembly and determine Public Key.

12. In Visual Studio Menu, Selection, Build -> Quick Deploy Solution -> Copy Binary(s)

This will compile our SharePoint project into DLL and deploy it to GAC. After deployment Output window will show that Deployment was successful:

13. Let’s go to Windows Assembly folder and find our library

If you open Properties of our assembly, you will be able to copy its public key token. In my case it was 7a1fde53a908a4fe.

We will need Public Key Token for our aspx.page.

Now, let’s return to our ASPX page.

14. Remove default text and add Page registration tag

<%@Page Language=”C#” MasterPageFile=”~/_layouts/application.master” Inherits=”{ClassName}, {Assembly}, Version=1.0.0.0, Culture=neutral, PublicKeyToken={PublicKeyToken}” %>

Now let’s replace {ClassName} with SPLocalization.LocalizedPage {Assembly} with SPLocalization {PublicKeyToken} with Public Key Token we obtained from GAC.

Now you should see something like this:

Now let’s add some content to the page and test if everything works.

15. Add ASP tag Content with ContentPlaceHolderID equals to PlaceHolderMain. Here is complete code

<asp:Content ID=”Main” ContentPlaceHolderID=”PlaceHolderMain” runat=”server”>

Test message

<!–asp:Content>

Your Localized.aspx page should look like this:

<%@Page Language=”C#” MasterPageFile=”~/_layouts/application.master” Inherits=”SPLocalization.LocalizedPage, SPLocalization, Version=1.0.0.0, Culture=neutral, PublicKeyToken=7a1fde53a908a4fe”%>

<asp:Content ID=”Main” ContentPlaceHolderID=”PlaceHolderMain” runat=”server”>

Test message

<!–asp:Content>

16. Let’s make a full deploy. Visual Studio menu Build -> Deploy Solution.

After deployment is completed, Output window will show that Deploy was successful.

17. Now let’s go and check manually if LocalizedPage.aspx was deployed.

Browse to 12 directory (by default it is “C:\Program Files\Common Files\Microsoft Shared\web server extensions\12”) then browse to TEMPLATE, then to LAYOUTS, then to SPLocalization. You should see our LozalizedPage.aspx was successfully deployed.

Now let’s try to access this page through SharePoint

18. Open SharePoint url of your site with prefix “_layouts/SPLocalization/LocalizedPage.aspx”.

In my case, it is “http://itech-vm-spdev/_layouts/SPLocalization/LocalizedPage.aspx&#8221;

When page is loaded you should see empty area but with our magic text: Test message

Now, let’s add SPLinkButton SharePoint control

19. Change your ASPX page to include Register of Microsoft.SharePoint assembly and replace static text with SPLinkButton control.

Your ASPX page should look like this:

<%@Page Language=”C#” MasterPageFile=”~/_layouts/application.master” Inherits=”SPLocalization.LocalizedPage, SPLocalization, Version=1.0.0.0, Culture=neutral, PublicKeyToken=7a1fde53a908a4fe”%>

<%@Register Assembly=”Microsoft.SharePoint, Version=12.0.0.0, Culture=neutral, PublicKeyToken=71e9bce111e9429c” Namespace=”Microsoft.SharePoint.WebControls” TagPrefix=”cc1″ %>

<asp:Content ID=”Main” ContentPlaceHolderID=”PlaceHolderMain” runat=”server”>

<cc1:SPLinkButton Text=”” runat=”server” ID=”myLink” />

<!–asp:Content>

20. Update your LocalizedPage class to include myLink definition. We will also assign Text value in OnLoad method. You class should look like this:

public partial class LocalizedPage : LayoutsPageBase

{

protected SPLinkButton myLink;

protected override void OnLoad(EventArgs e)

{

myLink.Text =”Our test link”;

}

}

21. Let’s do full deploy again

22. Once it is successfully deployed. Open LocalizedPage in the browser again. You should see that now you have a link on the page. This link is provided by SharePoint SPLinkButton control.

In the next article, we will discuss localization of the sample application we created…

Localization of SharePoint Project

By Hristo Yankov

UPDATE: For detailed step by step tutorial, check those posts:

SharePoint localization step-by-step part 1

SharePoint localization step-by-step part 2

Problem: The users require that your custom SharePoint ASP.NET site is available in more than one language. For instance – English and Hungarian.

Solution: ASP.NET localization. Technique is discussed in this article, step by step.

It is recommended that you leave localization to the end of the development, when page content is not going to change (too often). Otherwise, you will find yourself constantly syncing new web content with the resource files.


1. Create resource files.

Create a folder in your project called, for example, ‘Resources’ and add a new .resx file (right click -> Add -> New Item -> General -> Resource file) in it. DON’T give it a generic name like ‘Resources.resx’. Instead, name it similarly to your project – e.g. WarehouseManagement.resx. This will be the resource file for your default language (let’s assume it’s English).

2. Extract site content in the resource file

This is a boring, but relatively easy task to do. You need to extract page contents such as literals, control texts, headers, titles and etc. into the resource file. The actual text is being replaced with Resource reference, using:

<%$ Resources:[Resource File Name Without Extension],

[Resource Name]%>

For example, if you have:

<cc1:sptoolbarbutton id="btnSearch" runat="server" text="Search" 

OnClick="btnSearch_Click"/>

You extract the ‘Search’ button text into the resource file, and let’s assume you give it a key ‘btn_Search‘. Then you edit the button code so that you end up with:

<cc1:sptoolbarbutton id="btnSearchProperty" runat="server"

text="<%$Resources:WarehouseManagement,btn_Search %>"
OnClick="btnSearch_Click"/>

Another example:

<asp:content id="PageTitle" contentplaceholderid="PlaceHolderPageTitle" runat="server">

My Title Goes Here

</asp:content>

You extract ‘My Title Goes Here’ into the Resource file and let’s say you give it a key ‘Page_Title’. Then, you replace the page content with:

<asp:content id="PageTitle"

contentplaceholderid="PlaceHolderPageTitle"
runat="server">

<asp:Literal ID="literal" runat="server"
Text="<%$ Resources:WarehouseManagement,Page_Title %>" />

</asp:content>

Note that you can’t just have ‘‘ standing alone. This code either has to be embedded into another control’s property (Text, HeaderText, ErrorMessage, etc) or it has to be in a placeholder, which in this case is asp:Literal.

You need to do this for every text you want to localize.

Also, every page you are localizing, has to have those two attributes in the ‘Page’ node: Culture=”auto” UICulture=”auto”. Example:

<%@ Page Language="c#" MasterPageFile="~/_layouts/WarehouseManagement.master" Inherits="TestPage, WarehouseManagement, Version=1.0.0.0, Culture=neutral, PublicKeyToken=[token]" Culture=”auto” UICulture=”auto” %>

3. Second language

Once you are done moving your text into the resource file, you can make a copy of your resource file. Since we are localizing to Hungarian, rename the copy of the file to WarehouseManagement.hu.resx. Open the resource file for editing and translate the entries from English to Hungarian.

You have to keep the two resource files in sync. If you delete keys, add new ones or rename in one of them, the other one has to reflect it too.

4. web.config change

Make sure you have this node in your site’s web.config file:

<globalization fileencoding="utf-8"

uiCulture="auto" culture="auto" />

5. Deployment

Those resource files need to be deployed to your site’s App_GlobalResources folder. This usually is: C:\Inetpub\wwwroot\wss\VirtualDirectories\[Port Number]\App_GlobalResources

6. Language Preference

So how exactly do you set the language preference? How do you tell the page which localization (English or Hungarian) you want to see? That’s easy. Go to your browser’s Language setting and set your preference.

For IE:

Tools -> Internet Options -> General Tab -> Languages -> Add / Move Up / Move Down

For FF:

Tools -> Options -> Content tab -> Languages (bottom) Choose button -> Add / Move Up / Move Down

Your browser provides the page what is your language preference, by sending an appropriate header. So, at this point, what happens when the page renders? Browser sends the page request, along with the language preference header. ASP.NET replaces the resource reference with the actual value, from the appropriate resource file.

How ASP.NET determines which one is the appropriate resource file? Easy. Let’s say your first language preference is Arabic, second is Hungarian and third is English. You open the page, ASP.NET tries to find arabic localization file but fails, then it tries to locate Hungarian localization file – it is found and it is determined as the appropriate one to use.

What happens if your only language preference is ‘Arabic’ (and in our case, we don’t have localization for it)? We send the request, ASP.NET doesn’t find the right localization and since you don’t have other language preferences, it falls back to the default resource file, which is WarehouseManagement.resx and happens to be in English.

This gives you the ability to ‘plug and play’ new language localizations by simply copying one of the existing .resx files, give it a proper extension (depending on the language you are localizing to), translate the content and deploy it to the right location. You won’t need to change anything on your pages.

Also, note that this architecture allows every client of the web application to set language preference for himself, rather than you, setting the language translation globally for the whole site and every user.

For automation of the deployment of resource files, you may want to look into this blog post:

SharePoint Resources, Types, Use and Deployment


K2 [blackpoint] Installation Wrong Type of Database

By Hristo Yankov
As of today, you can install K2 [blackpoint] only on a clean (K2-free) environment. So if you are trying to install K2 [blackpoint] on an environment previously or currently used by K2 [blackpearl], you have no choice but uninstall K2 [blackpearl].

What you should be aware of, however, is the fact that the K2 [blackpearl] uninstaller does not remove the K2 databases (HostServer, Categories, Dependencies, etc) from the SQL server! If you try to install the K2 [blackpoint] databases on the same SQL server and haven’t deleted the K2 [blackpearl] databases manually, you will end up with the following errors during the K2 [blackpoint] installation:


So long story made short, make sure the K2 [blackpoint] database installation does not overlap with existing K2 [blackpearl] databases, as they are not being removed by uninstaller.

K2 Workspace 404 Not Found Error

By Hristo Yankov

In the process of a K2 installation, no matter distributed or on a single server, you have to setup the K2 Workspace. It is mostly well covered by the K2 Getting Started (Installation) documentation.

However, even if you follow strictly the instructions, you might get a 404 (Not Found) error when trying to access your Workspace. The following is a step by step guide on how to troubleshoot this error.


So you open your K2 Workspace and you are greeted by a 404 (Not Found) error. First thing you need to do is enable the logging of your K2 workspace web site. You can do that by running IIS Manager, navigating to Web sites, locating your K2 website, right clicking on it, selecting Properties from the context menu. It will open the properties of your web site. Navigate to the Web Site tab. There is a checkbox called ‘Enable Logging‘. Check it, and just in case do ‘iisreset’. Make a note of where the log is stored. It is usually in a C:\WINDOWS\system32\LogFiles\ folder.

Open your K2 Workspace site again, so the error is logged. Then navigate to the log folder and open the log file. You should see entries similar to:
YYYY-MM-DD HH:MM:SS W3SVCXXXX XX.XX.XX.XX GET /Workspace/default.aspx – 80 Domain\User XX.XX.XX.X long-client-description-entry-here 404 2 1260

The most important part of this error log is the error code. It is “404 2 1260”. 404, not found, could be caused by a couple of reasons. It is the “2” and “1260” part of this entry that specify what exactly it is. If you refer to this URL you will see that ‘2’ stands for “Web service extension lockdown policy prevents this request.” Basically, you have a policy, which is preventing the server from hosting the file.

Now, how to fix that? Go back to the IIS Manager and right click on the “Web Service Extensions” folder. From the context menu select “Allow all Web service extensions for specific application…”.

Then from the pop up window select ASP.NET v2.0 and click ok. iisreset and you should be fine.

If your error is not 404 x 2, but something else, the URL above should give you a hint on the root cause.

In the case of 404 x 2, this will fix your problem, but you might want to experiment with the Web Service Extensions policies, in order to achieve higher security level.

Troubleshooting Kerberos issues

By Hristo Yankov

Dealing with Kerberos in MOSS/K2 distributed environment is inevitable. First, let’s start with a quick overview of what is Kerberos.

From Wiki:

Kerberos is a computer network authentication protocol, which allows individuals communicating over a non-secure network to prove their identity to one another in a secure manner. It is also a suite of free software published by Massachusetts Institute of Technology (MIT) that implements this protocol. Its designers aimed primarily at a client-server model, and it provides mutual authentication — both the user and the server verify each other’s identity. Kerberos protocol messages are protected against eavesdropping and replay attacks.


What this means in the MOSS (with K2 worklist web part)/K2 context is:
End client’s browser requests MOSS page featuring the K2 web part, MOSS delegates the client’s credential to K2, K2 knows who the end user is and retrieves his or her worklist items.

Since this is a ‘troubleshooting Kerberos’ article and not ‘setting up Kerberos for first time’ we will assume that:

  • You have supposedly configured your network to work with it, by following the K2 documentation (Getting Started)
  • You went to the Active Directory on the Domain Controller and gave the computers and users participating in the process a Delegate right.
  • You have configured IIS to use Negotiate, rather than NTLM
  • You DO have worklist items waiting for you.
  • If you have more than one domain controller in the network you realize that replication time could be a problem. Make sure that if you do some domain changes (adding/removing SPN, trusting delegation and etc) you either force the replication or wait for the period of time. You might want to decrease it to 10-15 minutes.

Now, if you don’t see any of your items in the MOSS K2 web part, that’s the first sign your Kerberos setup is not working. Login to your K2 server (using the K2 Service credentials!), go to the Services and stop the BlackPearl service. Then run it in console mode so you can clearly see what the error is. Chances are, you will see error messages telling you that the user ‘NT AUTHORITY\ANONYMOUS LOGON’ was denied access.

Obviously what happens is – IIS is not passing the end client credentials to the next server in the chain, which in our particular case is the K2 server. Now starts the fun part, trying to determine why your Kerberos configuration is not working. Logically, you would start by enabling the Kerberos logging on all participating machines. You do that by running regedit and navigate to HKEY_LOCAL_MACHINE\SYSTEM\CurrentControlSet\Control\Lsa\Kerberos\Parameters. You should add a REG_DWORD entry with value of ‘1’. Also, on the machine issuing TGT you should add the key KerbDebugLevel with value of ‘1’, in the same Parameters folder. Enabling Kerberos logging is also explained here.

You might notice that Kerberos delays error logging, skips some or just doesn’t output when you expect it to. Eventually you will start seeing some logs in you Event Log viewer, System section. There might be gems such as:

  • KDC_ERR_S_PRINCIPAL_UNKNOWN
  • KDC_ERR_BADOPTION
  • KRB_ERR_RESPONSE_TOO_BIG
  • And other…

Microsoft tries to explain them here, but generally, the descriptions of those errors might be unclear or even misleading. During the course of a week-long Kerberos issue troubleshooting, the problem was pinpointed to the following items.

  1. Internet Explorer settings on the client side. Make sure that the client (using IE) has added your MOSS website to the list of Trusted Sites. This is done by going to the IE -> Tools -> Internet Options -> Security -> click on Trusted Sites -> Click on the Sites button -> type the url of the site and click Add. Also, make sure that the Security Level for the Trusted zone is Low. If that’s not possible, do a custom level (by pressing its button) and scroll down to the bottom of the pop up screen. Select “User Authentication->Logon->Automatic logon with current user name and password” radio button. Basically this tells the browser to pass the user credentials to the web site. Otherwise it will pass some anonymous user and it will never work.
  2. It is worth mentioning that IE 6 won’t work with Kerberos, if the web site is not running on port 80. It is explained in details here, but you can easily overcome this problem by using host headers, insted of ports.
  3. Kerberos UDP fragmentation. Yes, by default Kerberos is running over the unreliable UDP protocol. This means – there is no guarantee that the packages will actually reach the destination. So if you get a lot of KDC_ERR_S_PRINCIPAL_UNKNOWN and KRB_ERR_RESPONSE_TOO_BIG error logs, this might be the reason. It is explained here and the solution to that is right here. By setting the max packet size to 1, you force it to run over TCP. This will require reboot of the system, though.
  4. Duplicate SPNs. That is my favorite and less documented problem! To understand what is considered a duplicate, read this short article carefully! Turns out, you can not have “HTTP/portal.mydomain.com DOMAIN\ServiceA” AND “HTTP/portal.mydomain.com DOMAIN\ServiceB” in the same time! When you are adding a SPN, it should be assigned to only one user!

Getting rid of the duplicate SPNs is no fun at all. Currently, there is no good tool do that for you. You will have to do it manually. First, you will need to output all the current SPNs in your domain. It’s all explained here (3rd method).

  1. Get the spnquery.vbs script from here (click on the download button)
  2. Run it by executing “cscript spnquery.vbs * > my_SPNs.txt” in the command prompt
  3. Now you have all your SPNs dumped into the my_SPNs.txt file

Open it in your favorite text editor for review. Let’s assume your MOSS server is called “SRV-MOSS” and your domain is “domain.company”. Search the file for “SRV-MOSS”. You should see an entry like:

CN=SRV-MOSS,[…]
Class: computer
Computer DNS: […]
— HOST/SRV-MOSS.domain.company
— HOST/SRV-MOSS

It is fine. It shows that your MOSS server is trusted for delegation in the AD. Keep searching. You should see an entry similar to:

CN=[Application Pool Running User],[…]
Class: user
User Logon: [ApplicationPoolRunningUser]
— HTTP/SRV-MOSS
— HTTP/SRV-MOSS.domain.company

If the [ApplicationPoolRunningUser] is the domain user, running your MOSS web application pool, that is great, because it means that you have set a correct SPN! If you don’t find such entries at all, you have missed an important step and you need to add delegation, by running command similar to:

setspn -A HTTP/SRV-MOSS domain.company\ApplicationPoolRunningUser
setspn -A HTTP/SRV-MOSS.domain.company domain.company\ApplicationPoolRunningUser

However, if you find another user entry (different of your MOSS app. pool running user), listing HTTP/SRV-MOSS as service principal name, that’s a problem, because it’s a duplicate! You will need to remove it by executing:

setspn -D HTTP/SRV-MOSS domain.company\AnotherUser
setspn -D HTTP/SRV-MOSS.domain.company domain.company\AnotherUser

Search for other duplicates and if none, you are one step closer to resolving the problem. At this moment, it is great idea to Purge all current Kerberos tickets in the system, as they (and the lack of?!) are being cached for more than 20 hours. For that purpose, you need to obtain a copy of the free KerbTray program. You might already have it installed, so check in your Program Files\Resource Kits. If not, get it from here and disregard it’s saying the program is for Windows 2000 only. Here is a tip – if you are lazy and don’t want to install it on all machines, you can intall it on one and access it from the others by opening \\servername\C$\… (if enabled). The program usually runs fine that way, worst case you will have to copy it.

So, after you start KerbTray you will notice a new green icon in the system tray.

If you double click it will show you the current Kerberos tickets obtained for the system.

What you want to do is right click the icon and select ‘Purge Tickets’. Don’t worry, the system will obtain them again and that’s the whole point of the exercise.

Now go ahead and retest the network connectivity. Keep monitoring the K2 blackpearl server output. You should not see anonymous logons any more. Every network environment and its Kerberos configuration has something specific and its own flavor. Explore the references below to get further information and idea on how to troubleshoot Kerberos issues.

References:

InfoPath 2007 Digitally Signed Form Templates

By Hristo Yankov

If you are developing a K2 blackpearl / InfoPath 2007 / MOSS solution, at some point of time you might need to digitally sign your Form template. One of the reasons you may need to do that is, if you have to give ‘Full Trust’ to the form. That’s because MOSS will not allow you to submit (or event start filling out) a new InfoPath form, which requires full trust but is not digitally signed.

The process is pretty straight-forward – in InfoPath you click on the Tools in menu, select ‘Form Options’ and navigate to the ‘Security and Trust’ tab.

Then you click on the ‘Sign this form template’ checkbox and choose a certificate (or create a new one).


After doing this, you might be thinking that your InfoPath form is digitally signed and you can safely use the ‘Full Trust’ settings. In reality, after you deploy your solution and attempt to create a new InfoPath form in the Form Library, you get the following error:

“The form template is trying to access files and settings on your computer. InfoPath cannot grant access to these files and settings because the form template is not fully trusted. For a form to run with full trust, it must be installed or digitally signed with a certificate.”


Now, let’s think about how we usually edit InfoPath forms, which are already integrated with the K2 process. Usually we click on the InfoPath integration icon which opens the wizard and then we click on the ‘Design’ button, which opens the InfoPath application for us, so we can edit it.

(InfoPath Integration Wizard)

The problem with this approach is – by modifying the InfoPath form, K2 blackpearl invalidates your digital signature and effectively removes it. What happens is – you click on the ‘Design’ button, open the InfoPath form, set the signature, save the form, close it, ‘Finish’ the wizard, but next time you open the InfoPath form, your signature is gone. Even if you modify the InfoPath form outside the K2 studio, in the process of deployment, your signature is being destroyed again.

As a conclusion – there is no way you can deploy digitally signed InfoPath form, through the K2 blackpearl studio!

Fortunately there is a work-around. After deploying your solution, follow these steps:

  1. Navigate to your MOSS website
  2. Navigate to your Form Library where the form was deployed
  3. Click on Settings -> Form Library Settings
  4. Click on the ‘Advanced settings’ link
  5. Click on ‘Edit template’ link (Select ‘Yes’ at the question, if any)
  6. It will open the InfoPath form in design mode for you and will prompt you to save it somewhere. Don’t overwrite the InfoPath form which is in the K2 project. Just save this on the desktop, or somewhere else.
  7. Now, in the InfoPath go to the Tool -> Form Options… -> Security and Trust and select full trust radio-button.
  8. On the same screen – sign the form
  9. Save the InfoPath on the desktop again
  10. Use the Publishing wizard in the InfoPath application (File -> Publish…) to republish the form into the form library.

Now your InfoPath form is digitally signed and ready to use. Unfortunately, you will have to follow those steps after each deployment.